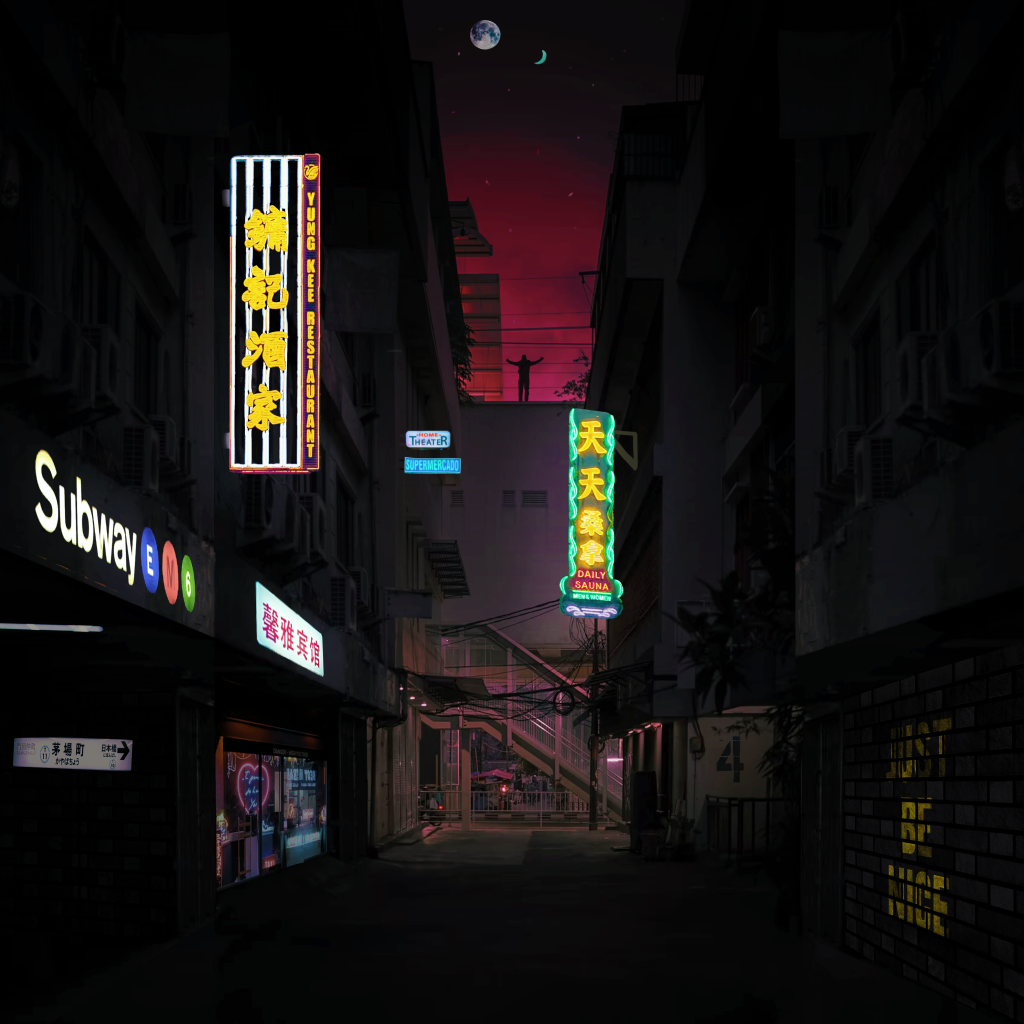
I experimented with manipulating photos in Photoshop to create a snapshot of a city, seen below.
INSPIRATION
I drew inspiration from how cities such as Tokyo, Osaka and New York City look during the night and the early hours of the morning. I found that these large cities during these hours often are illuminated by neon lights promoting various products, and wanted to incorporate some of these elements into my own piece.
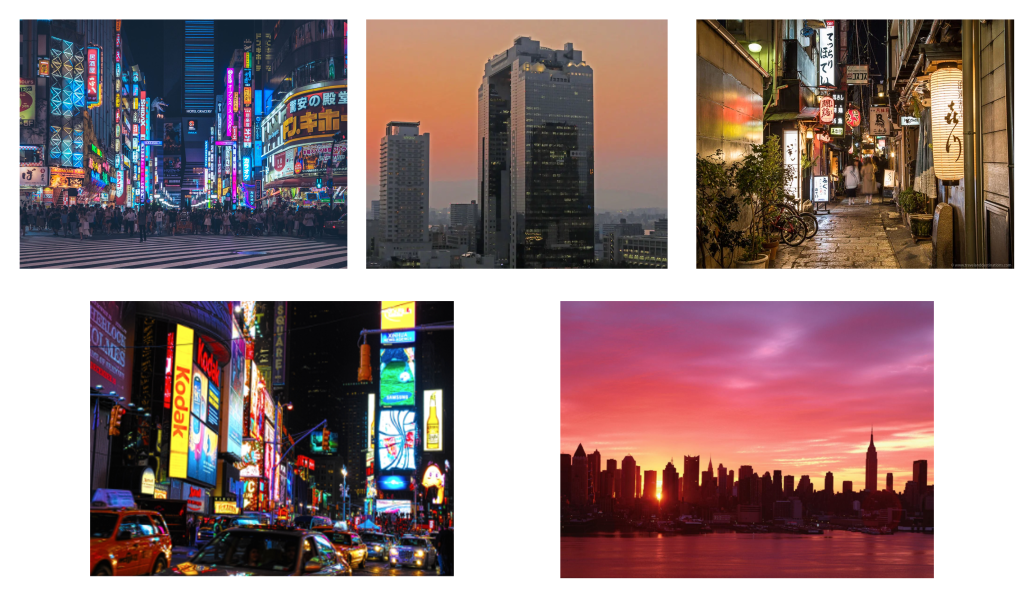
Bottom row (left to right): Times Square at night, New York City skyline at sunrise.
I had a loose idea of what I wanted to create prior to starting this piece – I wanted the piece to be of an area within a city and to have elements of realism, as when doing photo manipulation I found that it can be very easy to delve into creating fantasy pieces.
MANIPULATING IMAGES
I selected an image of an abandoned street from Unsplash and imported it into Photoshop; choosing an abandoned street over a populated street provided me with the opportunity to add to the scene without having to make major initial edits, such as removing people or vehicles. I had to make use of the lasso tool and the healing brush to select buildings to copy in order to make the original image fill the canvas whilst also removing any imperfections when lining up the buildings, creating the illusion of an extended street view.
I wanted to populate the scene with elements that would capture attention, such as a neon sign advertising a company or a simple sign for public transport. I gathered some neon signs and graffiti from varying images on Unsplash and other royalty-free image sites, removing as much of the surrounding background to create a single asset to be used in my image. I then imported them into the image by using Photoshop’s Vanishing Point tool, which allowed for me to create a plane for the image to be pasted on and made the image seem realistic in relation to the camera angle.
For the sky, I used a purple to red gradient masked over the image to add a darker and dramatic feel to the image. In conjunction with the blend modes, this also made the rest of the image significantly darker, thematically adding to the piece. With the other sections of the image, such as the graffiti and the signs within the subway entrance, I used Photoshop’s colour match ( Image – Adjustment – Match Colour) to this layer to keep the image darker and to keep the attention drawn on the main signs.
I wanted to draw the focus to the centre of the image, so I repeated my past steps with an image of a man with his arms outstretched to the sky. With the help of the blend modes in Photoshop, I rendered his previously bright outfit to a darker colour to thematically match the image. As the focus was being drawn to the centre of the image, I also wanted to add to the skyline. I repeated the above steps for two images of moons, imported them into the skyline and utilised the blend modes and the colour match tool to make it appear to be new planets.
One thing that I did challenge myself with was to emit light from the main signs seen in the street. As seen from the images that inspired this piece, the neon billboards and signs emit light to the surrounding areas. I used the built-in adjustments such as Curves, Luminosity, Hue/Saturation while also making use of the Shadow/Highlights tool found under Image – Adjustments to create the illusion that the signs are replicating this.

OUTCOME
Overall, I’m happy with the outcome of this photo manipulation. Through experimenting with the Vanishing Point tool, I was able to make the signs look believable in relation to the camera angle and the space provided and through further experimenting with the varying colour adjustments and blend modes that Photoshop provides, I was able to turn an abandoned, empty street with nothing to catch the eye of the viewer into a street that looks populated and dramatic, with the viewer’s eye being led to the centre of the image.
I could have potentially improved this piece by further experimenting with the lighting of the signs further. The lighting of the signs only extends for a small area, which can be seen on the connection points of the vertical signs whereas in reality, this would also extend onto the buildings and diffuse across the material, with the lighting being strongest near the sign and weaker further away from the light source.
Image references:
New York at sunrise:
ak077 (2018) New York Skyline at sunrise. Reddit. Available online: https://www.reddit.com/r/wallpapers/comments/9q1t76/new_york_skyline_at_sunrise/?utm_source=ifttt [Accessed 16 Dec. 2021].
Osaka streets at night:
Clegg, M. (2019) Osaka at Night: What to See and Do. Travel and Destinations. Available online: https://www.travelanddestinations.com/osaka-at-night-what-to-see-and-do/.
Times Square at night:
Pommie Travels (2012) Times Square at Night in New York City. Pommie Travels. Available online: https://www.pommietravels.com/times-square-at-night-in-new-york-city/ [Accessed 16 Dec. 2021].
Tokyo at night:
Reddy, M. (2019) How to spend a night in Tokyo. InsideJapan Blog. Available online: https://www.insidejapantours.com/blog/2019/03/01/how-to-spend-a-night-in-tokyo/ [Accessed 16 Dec. 2021].
Sunset from Osaka Station:
Wapiti Travel (2020) UPDATED MAY 2020: The best things to do in Osaka at night. Wapiti Travel. Available online: https://www.wapititravel.com/blog/en/osaka-at-night/ [Accessed 16 Dec. 2021].