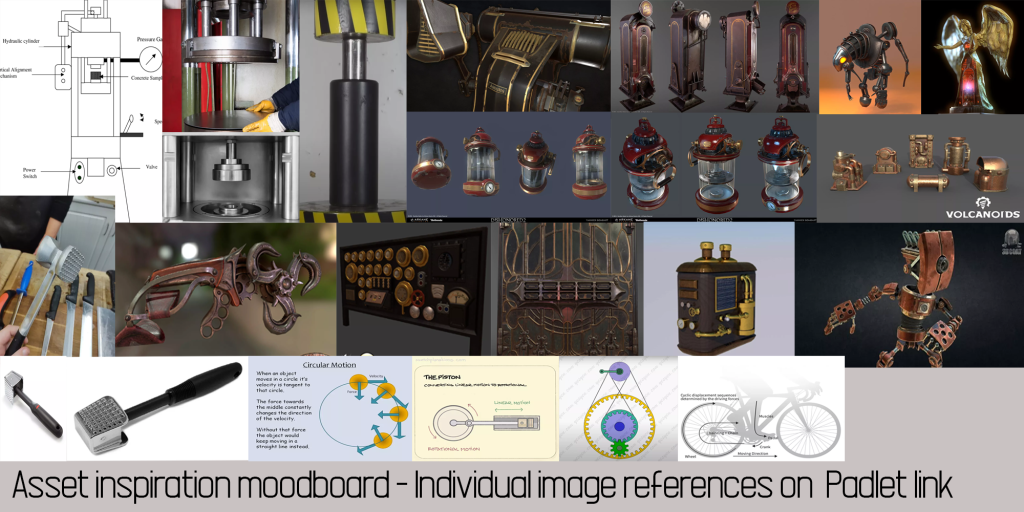
For this assignment, I was to create an asset to fit within a specific theme and location. The location that my group was assigned to was a Butcher’s shop, with a sub-theme of Victorian/Steampunk.
The references for the Inspiration mood board and any other referenced material are listed at the end of this post, below the 20-second turntables and screenshots.
RESEARCHING AND PLANNING
As the subtheme for our location is Victorian/Steampunk, I started to look at published assets from games such as Dishonoured and Bioshock Infinite for inspiration for my Hero Asset. As I have family who are butchers themselves, I was also able to gather reference images of tools and equipment that are used on a day to day basis that I could base my asset on- giving my asset a connection to real-life tools and equipment.
Padlet mood board: https://padlet.com/rusher2020/wqzhlh94kkakzso1
In addition to creating an inspiration mood board, I also created a timeline in order to complete this project. This helped me to visualise what tasks I had to complete on a week to week basis in order to meet the deadline.
Project Trello: https://trello.com/b/Vetxtqht/project-management-hero-asset
DESIGN EXPLORATION AND RATIONALE
I wanted to sketch out some potential asset ideas before deciding on a final design for my Hero Asset. As Butchers would have heavy, specialised machinery within their shops, such as for cutting through bone or for mincing cuts of meat, I wanted to take my asset down this path and create a specialised machine.
In essence, I wanted my hero asset to be an amalgamation of the old burger press that can be seen on my mood board and a hydraulic piston to create a machine tenderiser. This would overall, reduce the total effort that someone would have to exert if they were tenderising a piece of meat using a mallet, and would also reduce the chance of injuring the muscles in their upper arms and shoulders through consistent repetitive motions.
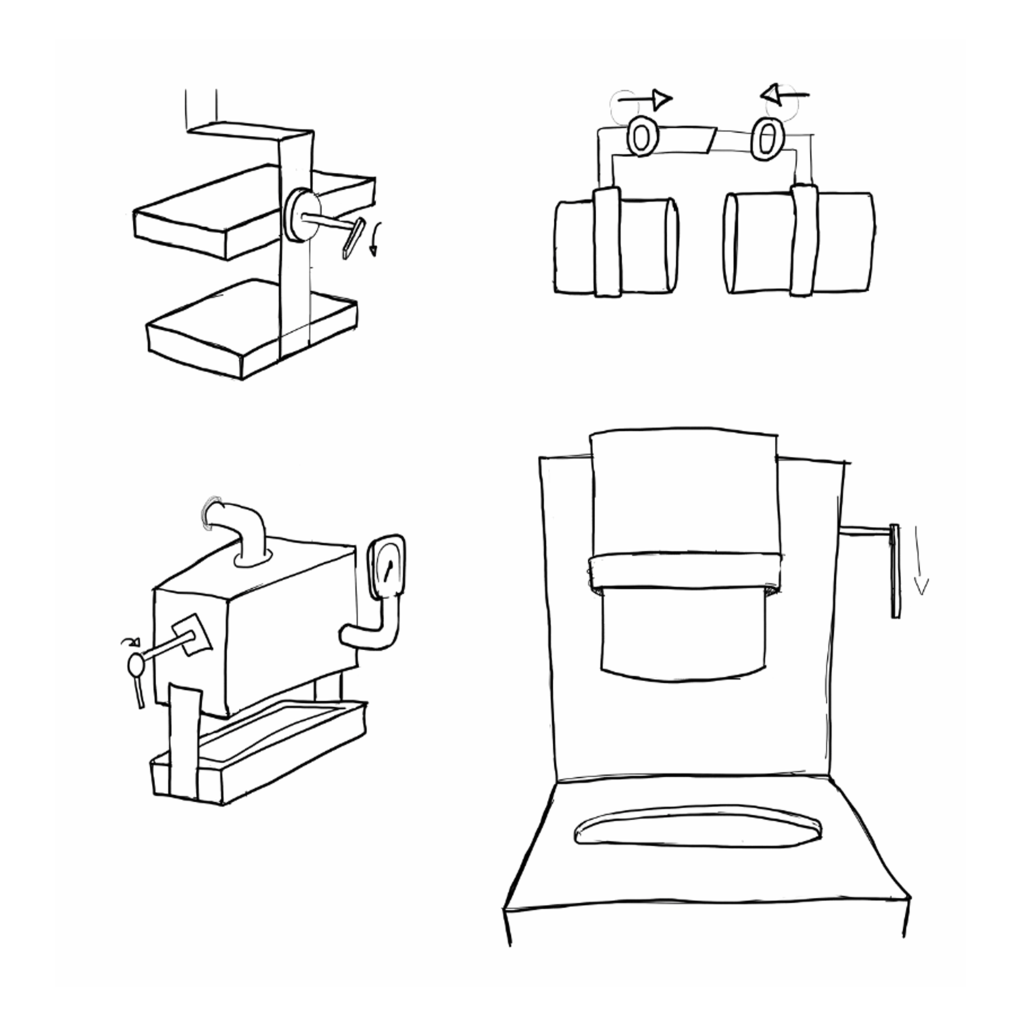
I narrowed the initial sketches down to two designs that I believe could easily convey the idea of being a machine tenderiser whilst incorporating steampunk elements that I had seen in other assets, such as pipes, gears and pressure gauges in order to draw the eye of the player.
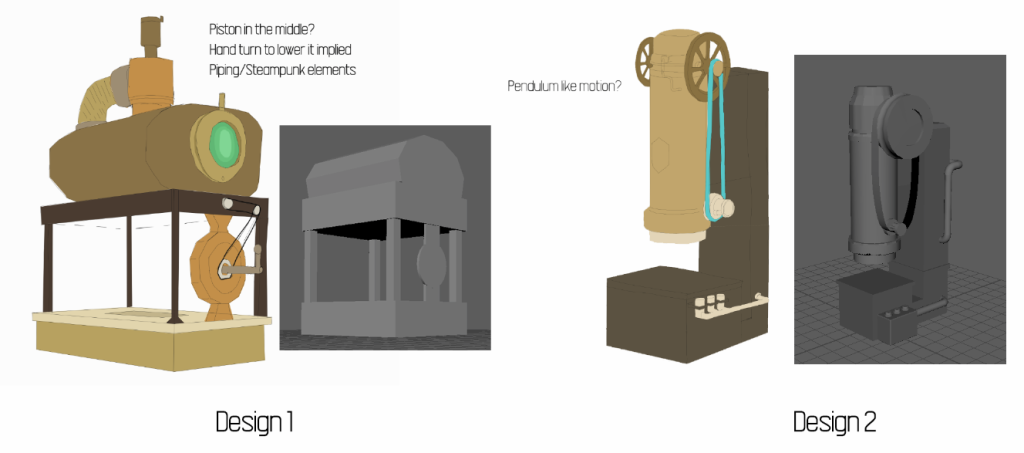
When testing the initial base shapes of these designs in Maya, I found design 1 to be very large and cumbersome, even in its initial block form. In addition to this, I also had to consider the actual size of the environment and how the space would be with the other assets of my team. We decided to keep the area in which we are to place these assets relatively small in order to keep the environment believable to be a Butcher’s shop within a city, which ultimately led to choosing design 2 over design 1. I believe that the first design would have been too large for the space and would have ultimately worked in a more open environment.
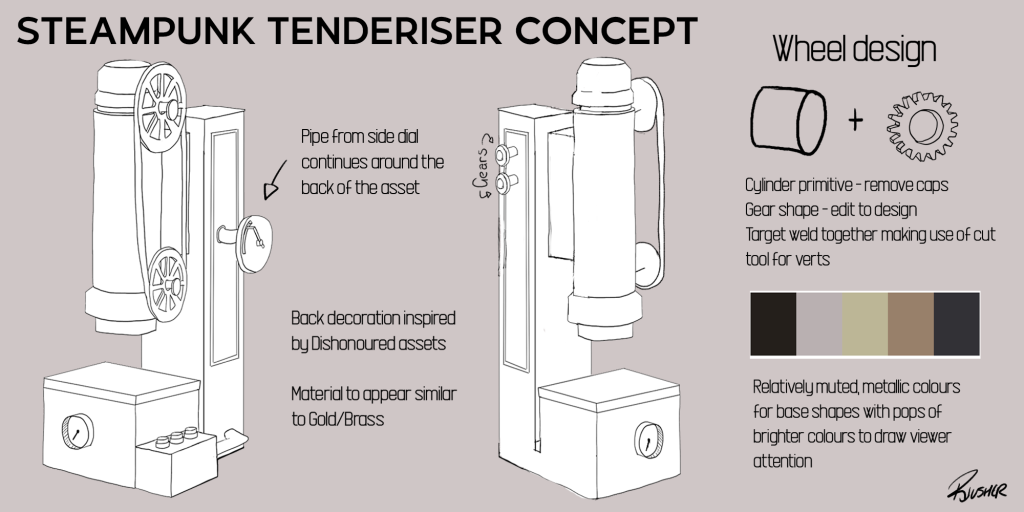
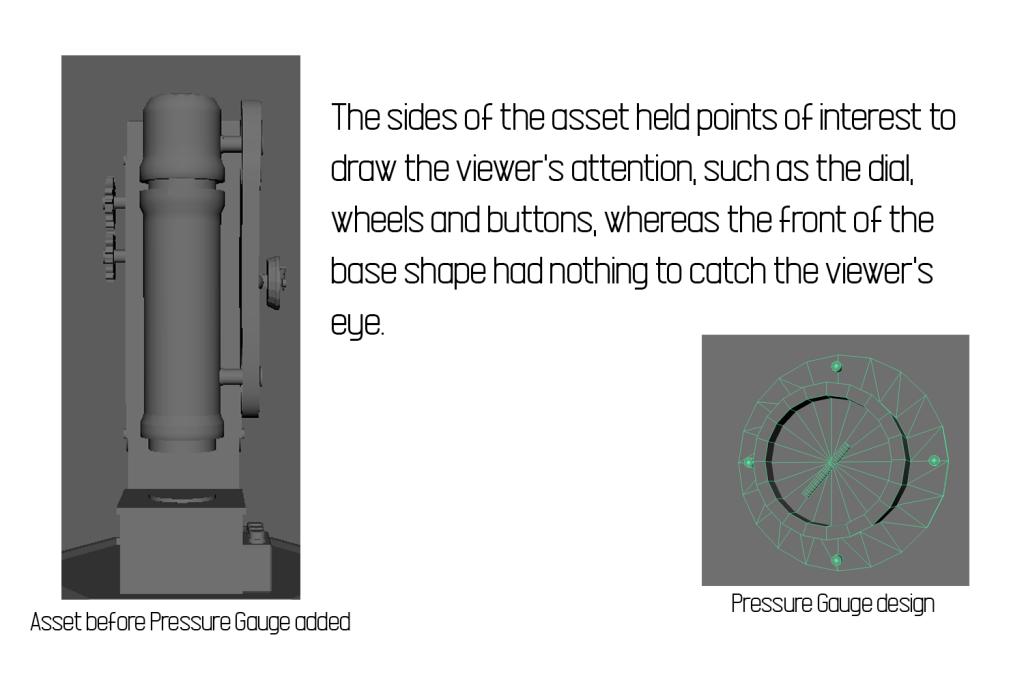
I decided that when creating the steampunk tenderiser, I wanted to feature elements that would make for a visually interesting design, such as adding materials to the asset to make it appear as though it has been chipped and aged as it has progressed through time and creating intricate designs for the wheels to draw the attention of the viewer. The ageing of the material connects to the story elements that the team discussed, with the owner of the shop creating their own tools over buying from other stores.
As the steampunk genre commonly features the use of materials such as brass and gold, I wanted to ensure that I textured my asset in accordance with the subtheme. Furthermore, the metallic nature of these materials reflected the lights within the Unreal environment, which made the asset appear brighter and helped to add further attention to the asset within the scene.
MODELLING AND TEXTURING
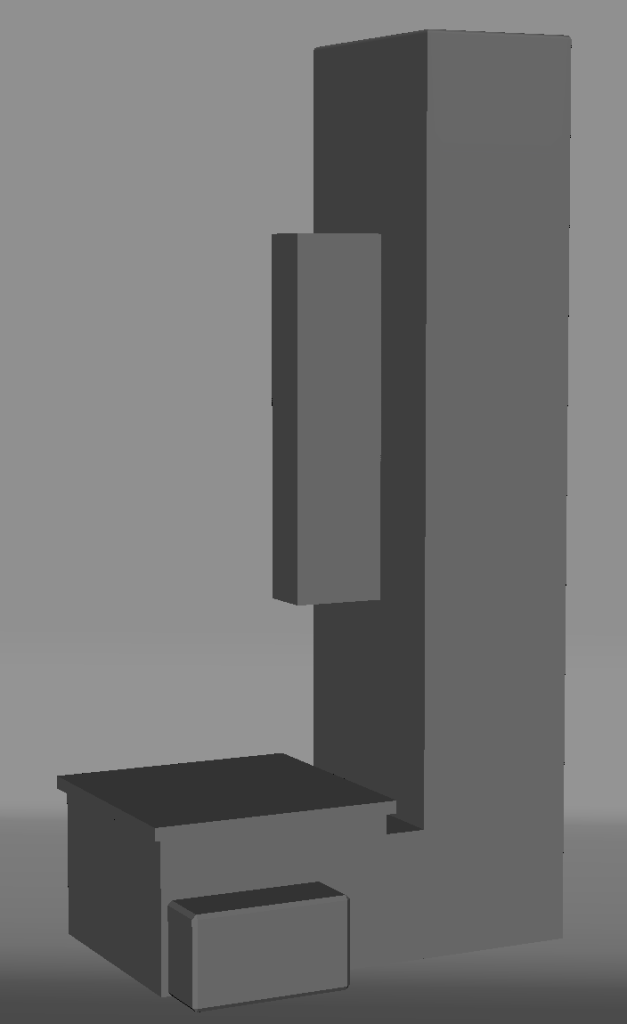
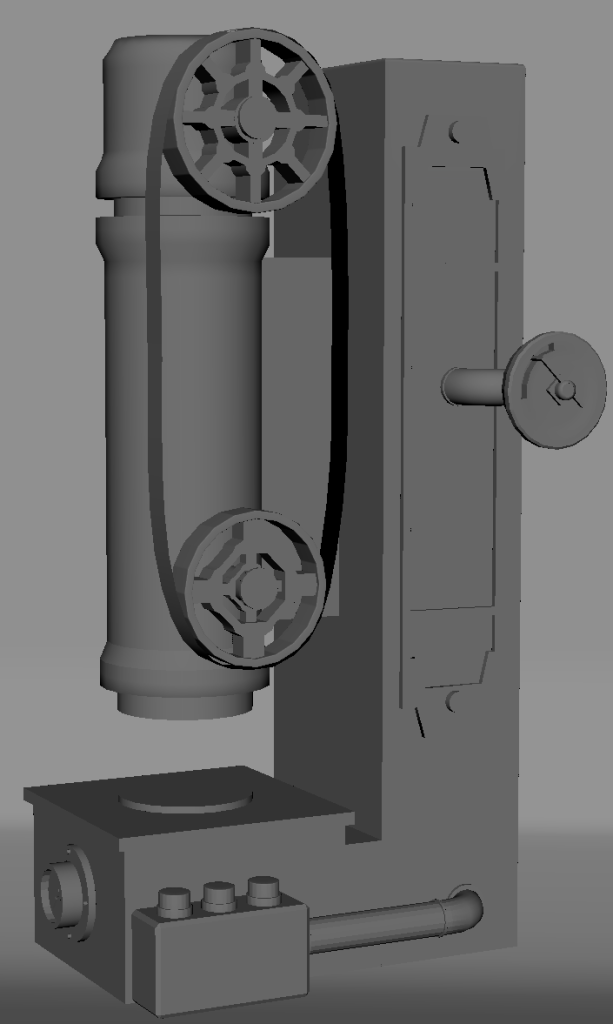
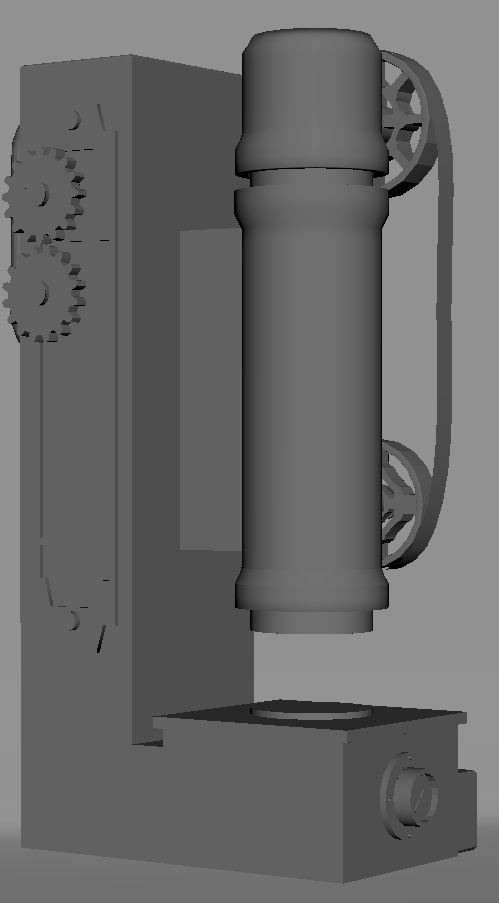
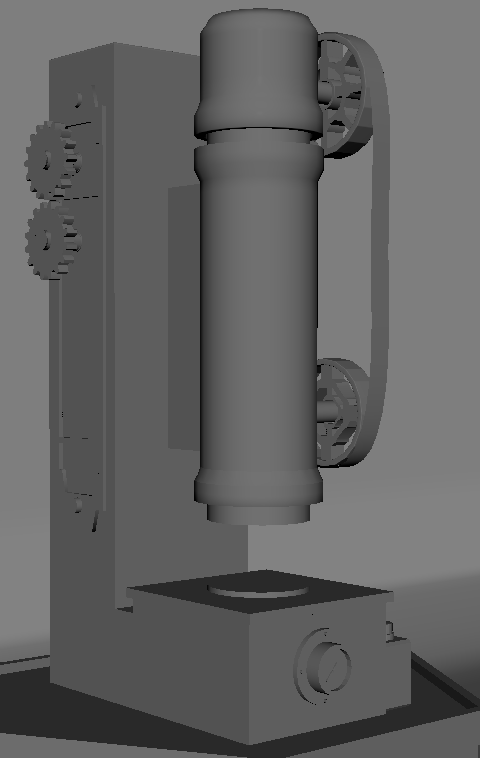
Screenshot 1, seen below, shows the creation of the base shape for my Hero Asset, as otherwise, the piston section of the asset would be floating, unsupported by anything. This started through the use of multiple cube primitives that had been rescaled to various sizes and had been welded together through the use of Maya’s target weld tool. When initially designing the asset, I knew that I wanted the back section to be relatively large to imply that it held the inner workings of the piston within it. Moreover, I wanted to layer additional cube primitives on the bottom portion of the base shape to create smaller details that could be picked up by the viewer. This can be seen on the front-most cube, with a rescaled and manipulated cube primitive acting as a base plate for tenderising.
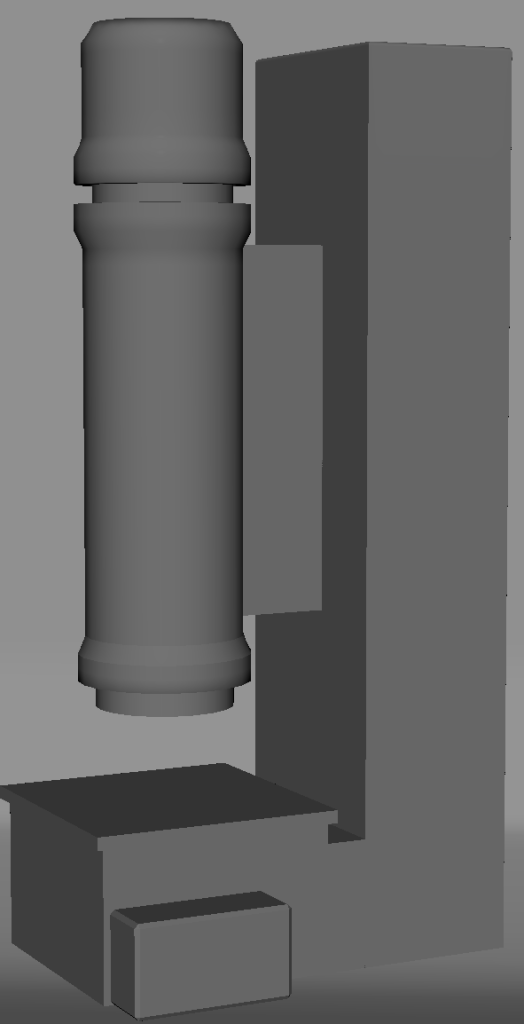
Screenshot 2 shows the creation of the piston and the casing. This was done using a cylinder primitive that had been rescaled vertically to become the internal piston along with a secondary cylinder primitive to act as the casing, as realistically the piston would not be exposed and would be housed within another material. To add further detailing to the piston casing, I started to extrude and remove faces that had been created with the edge loop tool, which can be seen along the bottom of the case of the piston and around three-quarters of the way up. The removal of a section of faces around three-quarters of the way up the outside of the piston case was to allow for the internal piston to be seen, as, without this, only a small section was visible which reduces the overall impact of the asset.
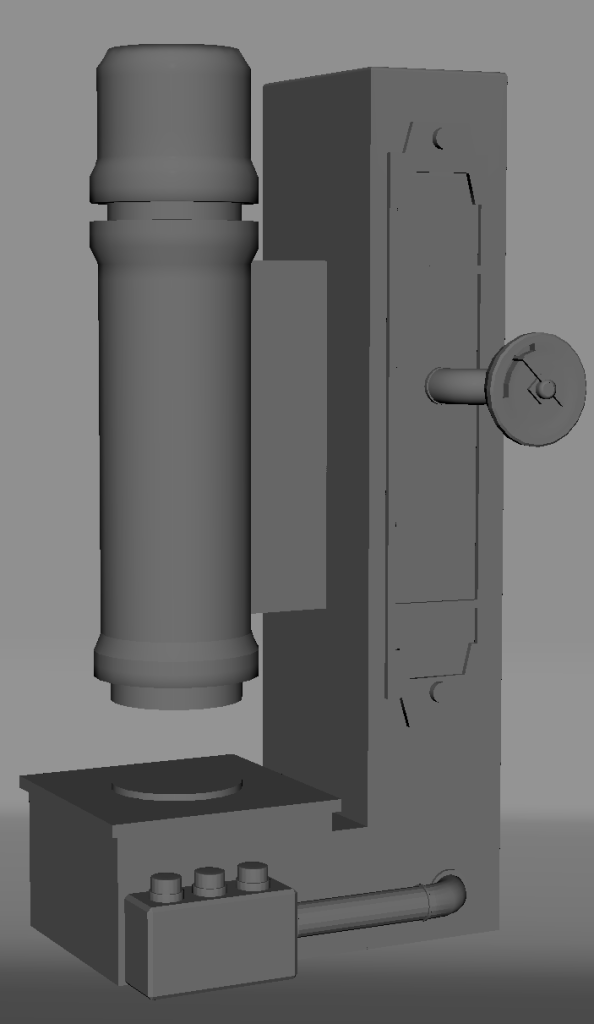
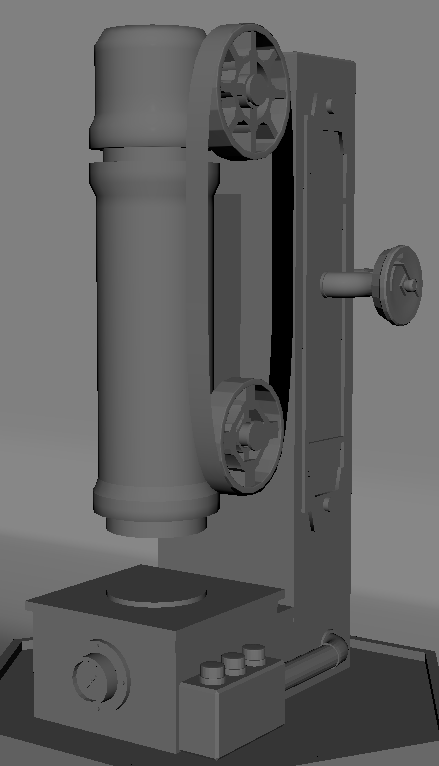
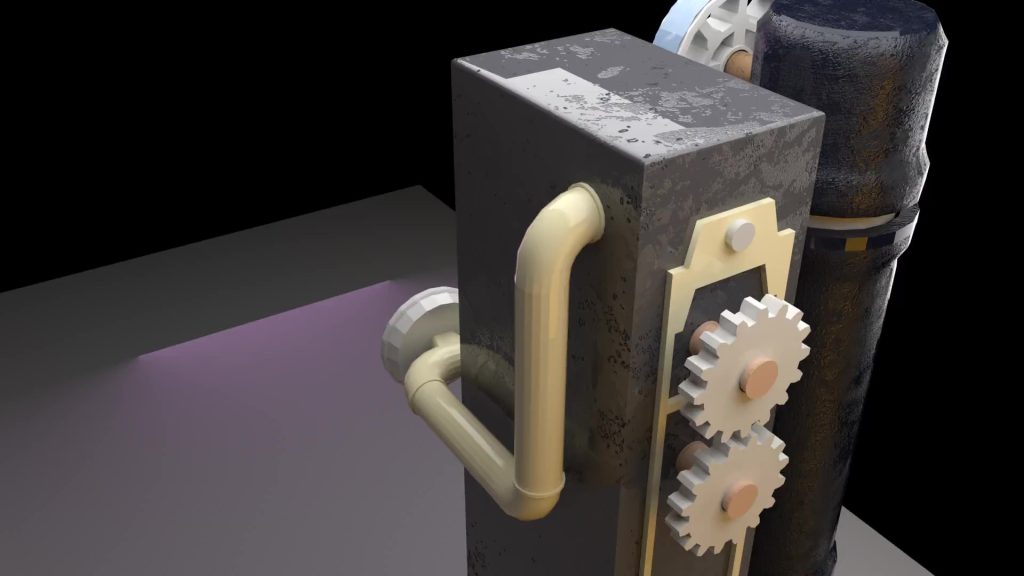
Screenshot 3 shows further detailing being applied to the base shape through the addition of the pipes, embellishments on the back and adding a method for human input. The pipes were created using a modified torus primitive that had three-quarters of the shape removed to create a smooth curve that can be seen on both pipes in screenshot 3. From this, one of the edges of the remaining torus was then extruded to create the remainder of the pipes

As mentioned above, the detailing on the back of the shape was inspired by the Dishonoured assets featured on the mood board, primarily Eric Pira’s “Whale Oil Dispenser” (Pira, 2017b). The decoration was formed from a cube primitive that had been extruded and mirrored along the y-axis to ensure that it would be symmetrical; This was then duplicated on the left of the steampunk tenderiser to provide a sense of unison among the detailing.
The dial element seen on the side of the asset was rather difficult to make, as the indented section was created by using a Boolean difference. To create the desired curve of this indented section, I had to extrude a NURBS EP curve with a NURBS square, which allowed me to control the intricacies of the curve by manipulating verts. The creation of the buttons, however, was a complete contrast to the difficulty of the dial and was created through the use of cylinder primitives. This was then duplicated twice more to give the impression that the machine has multiple modes for controlling it.
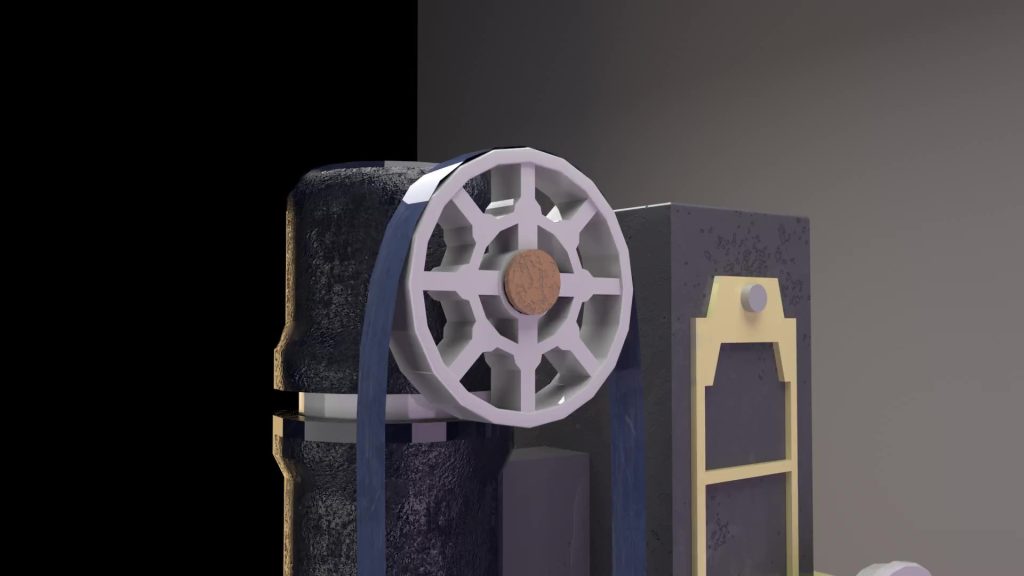
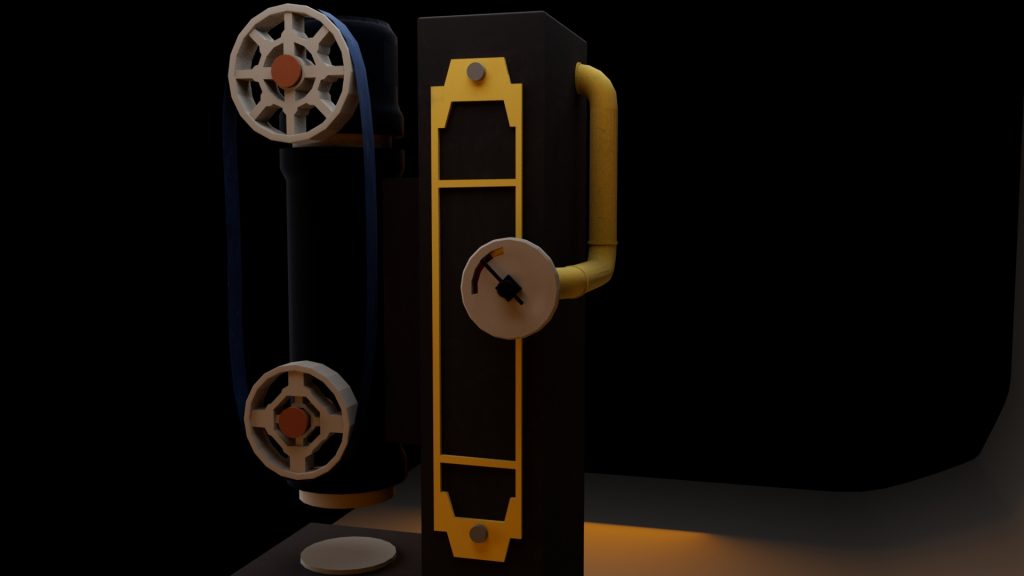
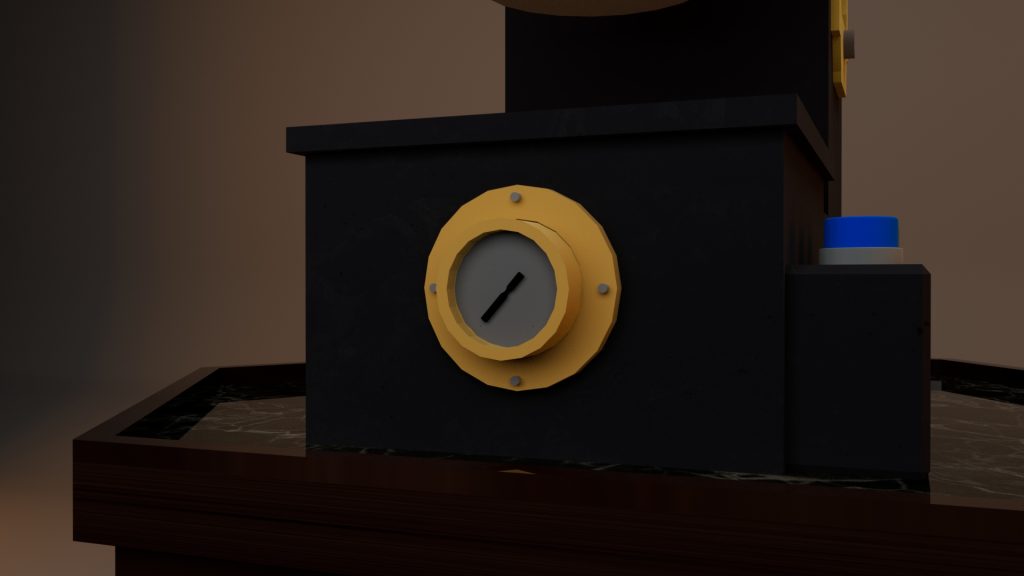
Screenshot 4 shows the creation of the wheel mechanisms for the piston. The design of the wheels, as shown in the tenderiser concept art, was created through a cylinder primitive that had both caps removed and a gear shape placed within. Initially, the design for the wheel was going to feature only one gear shape within the cylinder, yet this was changed when realising that the space left for the connecting cylinder was too big, prompting the second smaller gear inside of it. The top wheel was then duplicated to create a secondary wheel lower on the piston. In addition to the two wheels, taking inspiration from the motion and bike chain reference images that I had found on my Padlet mood board, I created a belt to be placed over the wheel shapes. Moreover, I decided to create a small pressure gauge to attach to the front of the machine.
Screenshot 5 shows the final details being added to the left-hand side of the shape. I added two small gear shapes attached to cylinders to imply that they would move as the steampunk tenderiser is moving. Additionally, I positioned each of the gears so that as one would begin to move, the second one would also move – further adding machine elements to my hero asset.
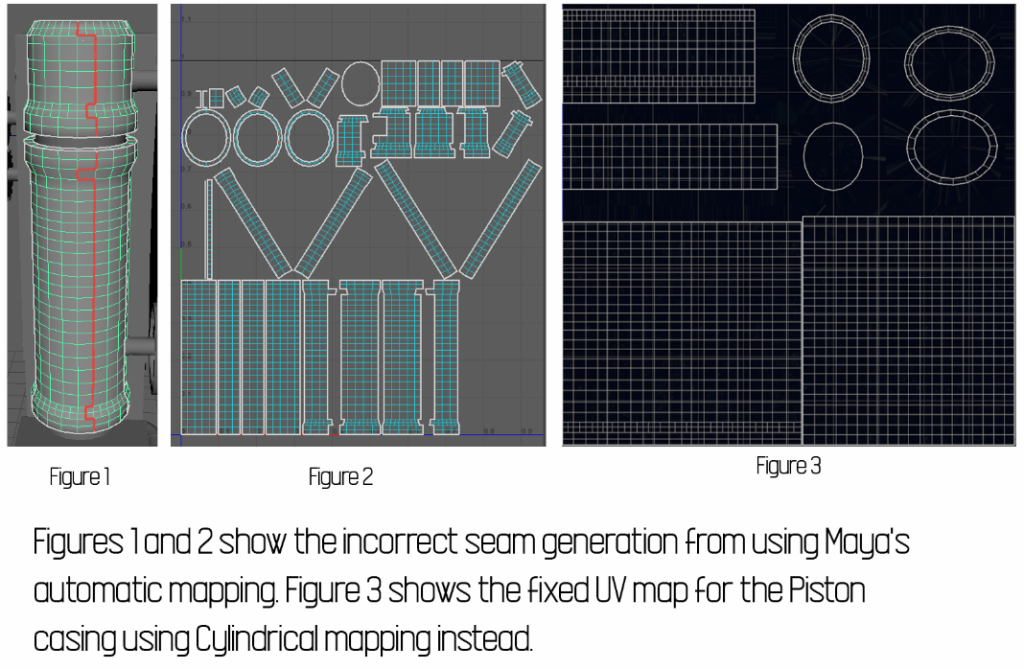
Once the asset was created, the next step was to create the UV maps. For the majority of this asset, I made use of Maya’s automatic UV mapping, such as for the base shape due to it being formed from cube primitives. Slight adjustments were made to the layout of the UV shells, as it had generated some of the shells overlapping which would have affected the texturing process.
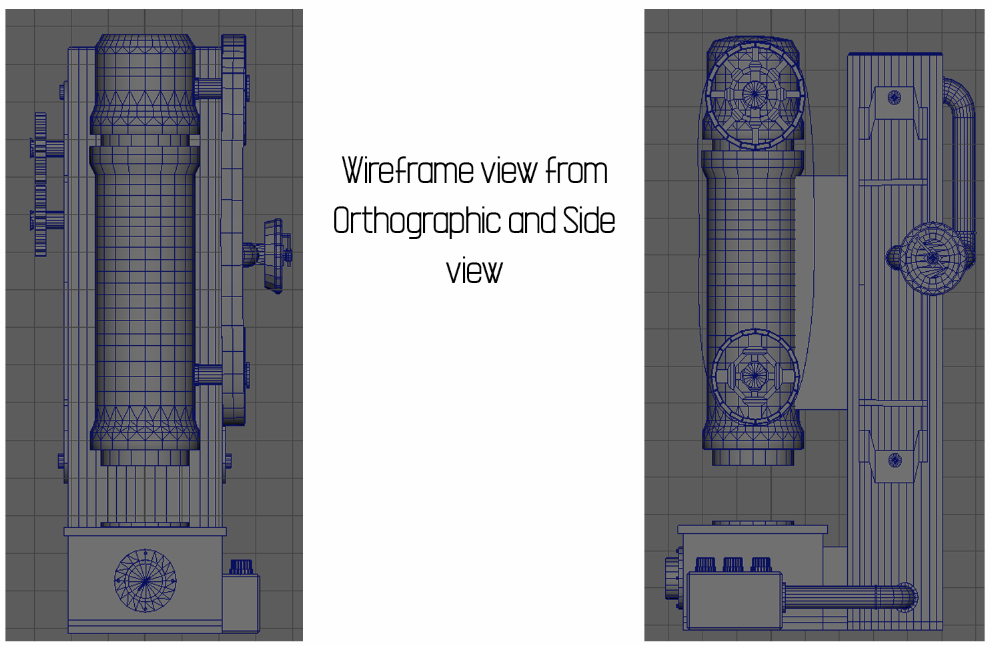
I did run into an issue with this form of UV mapping when originally mapping the casing for the piston. When mapping the piston casing, I had originally mapped it using Automatic mapping, which had generated a number of seams in various positions that would make texturing difficult. When testing how textures would be displayed through toggling the UV checker map, the texture was distorted and did not smoothly meet up due to the incorrect seam generation. This can be seen in figure 1, highlighted in red. This issue was fixed by using cylindrical mapping instead of automatic mapping, which generated the correct UV maps, as seen in figure 3.
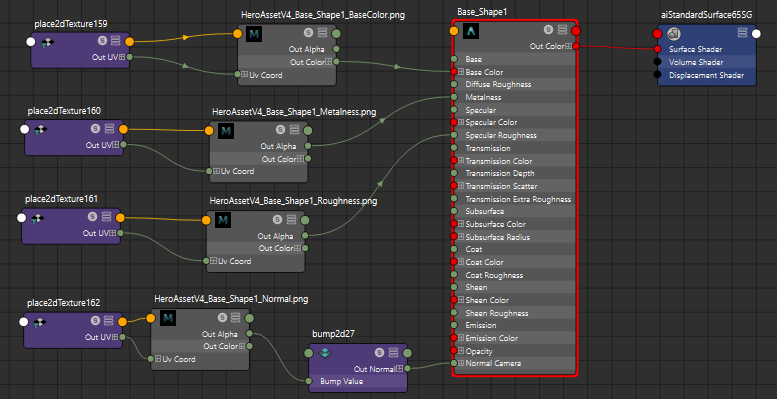
Adobe Substance Painter was used to texture my Hero Asset. I was able to layer and manipulate pre-existing materials to create the desired textures for my asset. From the reference and inspiration images that I had gathered, I started to texture my asset with various metallic textures that would fit within the chosen theme.

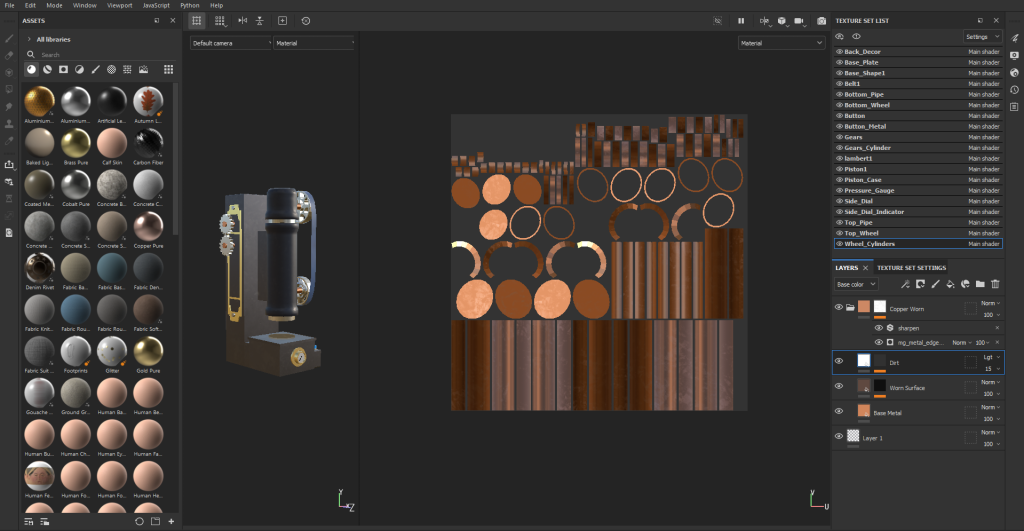
Once the textures had been exported from Substance Painter, the following step was applying and setting up the materials within Maya. I followed a guide created by Adobe on how to set up materials within Maya’s HyperShade interface and how to apply them to my asset (Adobe, 2021).
LIGHTING
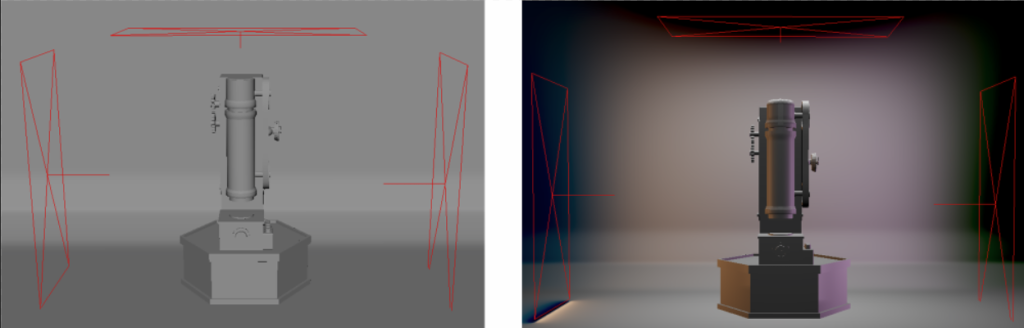
Within Maya, I set up a three-point studio lighting to highlight my asset before rendering the turntable. I followed a Youtube tutorial on lighting a scene for rendering, which I slightly modified for my own asset (Academic Phoenix Plus, 2020). After testing rendering using the Viper render farm, I made slight adjustments to the intensity and colours of the lights, as some of the textures on the initial renders appeared faded when highlighted by harsh white lighting.
ASSET CONNECTIONS TO LOCATION AND THEME
As our theme is steampunk, I incorporated key elements that I had seen in other published imagery and designs into my Hero Asset. Elements of my asset such as the pipes that feed into the machine, the gears on the left-hand side and the pressure gauge at the front are all aspects taken from the steampunk genre. Secondly, the theme features a frequent use of metallic materials, such as gold and brass, which I applied to areas such as the decoration on the back of the machine, the pipes and the pressure gauge that is featured on the front.
As mentioned above, my asset ties into the narrative of the environment through texturing. The narrative for the Environment is that within a city that has all of these technological advancements, the owner chooses to make their own tools rather than buying them from another business. The scratch marks and chips in the material imply that this machine has been in the shop for a long time in comparison to some of the assets of my team, with the potential damages be from moving and relocating it within the space.
PEER FEEDBACK AND DISCUSSION
When initially designing my asset, I had a discussion with one of my teammates, Marshall, about potential changes to the design. My design was going to initially feature a lever on the left-hand side of the tenderiser as a way of becoming the human input, but through discussion, this was changed to the current button input that I prefer.
As a team, we had spent some time meeting at the University during the Enhancement week to start initially planning out our assets. During this time, we also held the meetings on Discord as one of our members could not physically attend, which ensured that they could also join in the discussion regarding their asset design. We kept each other up to date using Discord and held group calls, whilst I also helped out some of my teammates privately in individual calls regarding any issues they were having.
VIDEO RENDER AND SCREENSHOTS
Hero Asset – 20 Second Turntable – Rebecca Usher

Referenced Material
Academic Phoenix Plus (2020) Quickly Create Studio Lighting in Maya 2020 for Modern Furniture. www.youtube.com. Available online: https://www.youtube.com/watch?v=ZI81pK9KsME [Accessed 22 Apr. 2022].
Adobe (2021) Substance guide to Rendering in Arnold for Maya on Substance 3D Tutorials. substance3d.adobe.com. Available online: https://substance3d.adobe.com/tutorials/courses/Substance-guide-to-Rendering-in-Arnold. [Accessed 22 Apr. 2022].
Hero Asset Moodboard References
3d-coat (2015) Robot Steampunk 3D-Coat 4.5 PBR – Download Free 3D model by 3d-coat [91eb0eb] – Sketchfab. sketchfab.com. Available online: https://sketchfab.com/3d-models/robot-steampunk-3d-coat-45-pbr-91eb0eb061024bf1bc5e3eb5ffe385d8 [Accessed 21 Mar. 2022].
ALEIOS Studio (2021) Steampunk assets -generic decoration – Volcanoids project. ArtStation. Available online: https://www.artstation.com/artwork/lxxW45. [Accessed 17 Mar. 2022].
Arofly (n.d.) AROFLY. AROFLY. Available online: https://www.arofly.com/main/arofly-en/ [Accessed 17 Mar. 2022].
Bolton, A. (2022) Sky-Hook. ArtStation. Available online: https://www.artstation.com/artwork/Jew9Xn.
Brewer, K.G. (2014) No Meat Mallet? Use These Other Household Items In A Pinch. Allrecipes. Available online: https://www.allrecipes.com/article/meat-mallet-replacement/ [Accessed 17 Mar. 2022].
Crazy Hidraulic Press (2021) HYDRAULIC PRESS COMPRESSES METALS WITH A PRESSURE OF 15,000 BAR. www.youtube.com. Available online: https://www.youtube.com/watch?v=tr9xnXlpq4M [Accessed 17 Mar. 2022].
Currie, D. and Honaker, C. (2022) The Best Meat Tenderizers for Creating Your Juiciest Steak Yet. The Spruce Eats. Available online: https://www.thespruceeats.com/best-meat-tenderizers-4799729 [Accessed 17 Mar. 2022].
Ferrara, R. (2021) How Does A Hydraulic Press Work? Made Simple. Atlantic Hydraulic Systems. Available online: https://atlantichydraulicsystems.com/how-does-a-hydraulic-press-work-made-simple/ [Accessed 17 Mar. 2022].
Hey, J. (n.d.) The piston. Sketchplanations. Available online: https://sketchplanations.com/the-piston [Accessed 21 Mar. 2022].
Hunt, G. (2014) Bioshock Infinite Assets. ArtStation. Available online: https://www.artstation.com/artwork/vakv. [Accessed 20 Mar. 2022].
iStockPhoto (2020) Close-up of the pressure equipment on the production line. iStock. Available online: https://www.istockphoto.com/photo/close-up-of-the-pressure-equipment-on-the-production-line-gm1213230810-352502314 [Accessed 17 Mar. 2022].
JuliaRM (2018) Introduction to Circular Motion | Teaching Resources. www.tes.com. Available online: https://www.tes.com/teaching-resource/introduction-to-circular-motion-11692420 [Accessed 21 Mar. 2022].
King, C. (2018a) Bioshock Infinite – Song Bird Prototype. ArtStation. Available online: https://www.artstation.com/artwork/NnbON. [Accessed 21 Mar. 2022].
King, C. (2018b) Bioshock Infinite: Memorial Tower Cutaway. ArtStation. Available online: https://www.artstation.com/artwork/nnyv1.[Accessed 21 Mar. 2022].
Mawgush (2018) Steampunk Computer Case – 3D Model by Mawgush. RenderHub. Available online: https://www.renderhub.com/mawgush/steampunk-computer-case [Accessed 21 Mar. 2022].
Piard, L. (2017) Dishonored2 – Arkane Studios – 2016. ArtStation. Available online: https://www.artstation.com/artwork/zqOzQ. [Accessed 21 Mar. 2022].
Pira, E. (2017a) Jindosh Enigma. ArtStation. Available online: https://eric_pira.artstation.com/projects/lb1Zo. [Accessed 21 Mar. 2022].
Pira, E. (2017b) Whale oil dispenser Dishonored 2. ArtStation. Available online: https://www.artstation.com/artwork/EX544. [Accessed 21 Mar. 2022].
Tokarev, K. and Gombart, Y. (2017) Asset & Material Production in Dishonored 2. 80.lv. Available online: https://80.lv/articles/asset-material-production-in-dishonored-2/. [Accessed 21 Mar. 2022].
Turton, R. (n.d.) Figure 3.4: Schematic Diagram of a Hydraulic Press. ResearchGate. Available online: https://www.researchgate.net/figure/Schematic-Diagram-of-a-Hydraulic-Press_fig1_267374531 [Accessed 17 Mar. 2022].
Yes Yen GraphiTech (2014) 507 Mechanical Movements – No: 057 – Back Gear Animation. www.youtube.com. Available online: https://www.youtube.com/watch?v=sdLnf7PjS8w [Accessed 17 Mar. 2022].