With the use of Unreal’s cinematic sequencer, I started setting up cameras to finalise and record the sequence. I found it significantly easier to pilot the cinematic cameras and create keyframes as I moved over using the movement gizmo, as being able to pilot the cameras ensured that I was able to keep the camera facing the specific subjects for the designated shot.
CAMERAS AND FOCAL LENGTH
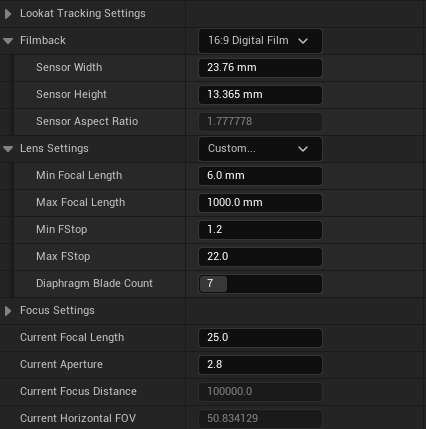
Within the scene, there are two cameras that create the main sequence. The first camera, which starts outside at the top of the city, has a focal length of 25mm, which allows the viewer to see more of the city in the distance; The sole purpose of this camera is to capture the cityscape as it pans down, and to have it remain between the film standard of 35mm to 55mm (Film Lifestyle, 2022; Day, 2020) would have negatively impacted the timing of the sequence due to having to start at a distance in order to capture the scene, which would have made the camera have longer to travel across.
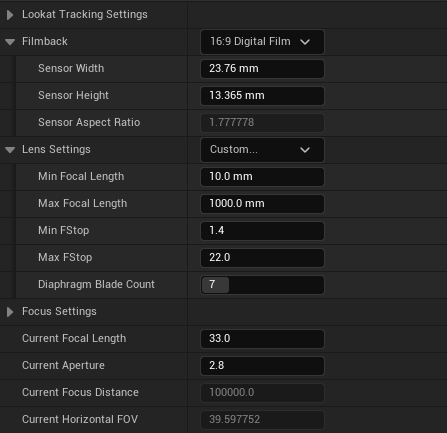
The second camera has a focal length of 33mm, which is closer to the film standard but allows for slightly more of the scene to be seen from the camera. This first camera transitions to this camera upon moving down the alleyway, as this focal length is more suitable for closer details. I did experiment with attaching the Niagara system that controls the rain effect to the second camera to optimise the camera use for the outside areas, yet the rain would noticeably stutter and lag upon the camera movement, which I believe originates from the lifetime of the particles and ultimately decided to keep the rain effect at a static location.
RULE OF THIRDS
In the creation of the sequence, I also used the “Rule of Thirds”. Using the rule of thirds in the Set Dressing stage and additionally during the sequencing allowed for certain narrative beats to be amplified and the use of good camera work.
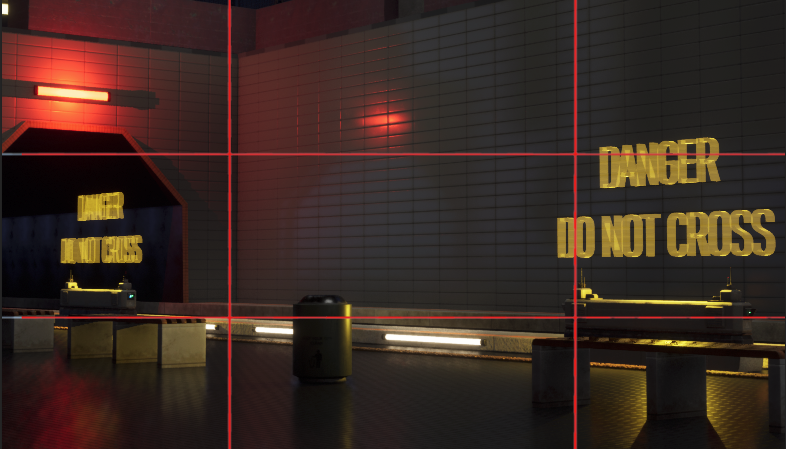
As an example, in the train platform section of the scene, both of the holograms are positioned along or near the overlapping points of the thirds grid, which helps to draw the viewer’s eye to these specific locations against the negative space (Adobe, 2020). The difference in the yellow colour of the hologram in comparison to the relatively dark background further creates contrast, clearly presenting a warning to the viewer to not cross a specific threshold.
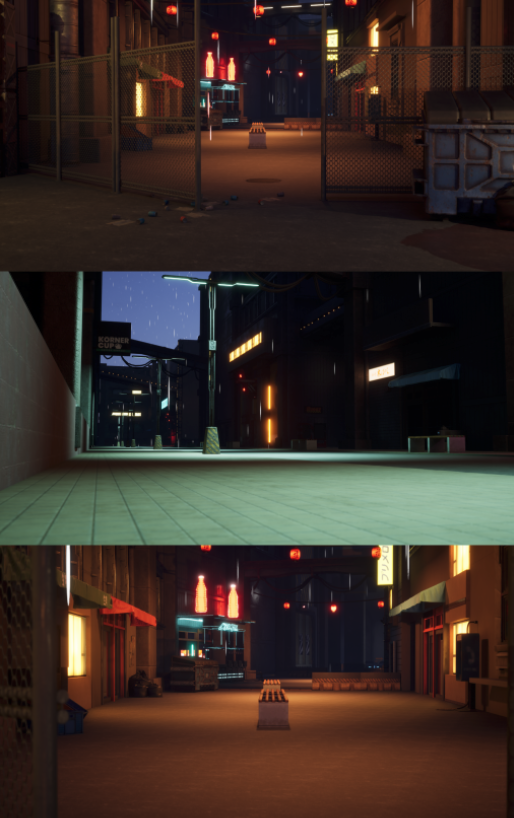
This was taken into consideration when building the entirety of the scene; In the alleyway, as the camera is approaching the street bar, two-thirds of the frame is filled with the bar whilst the remaining third frames the remainder of the street and the garage section, as during this section I wanted the viewers focus to be on how having a bar in the street has seemingly become commonplace among shopfronts and accommodation. The remaining third of the street features the garage section in the distance, framed by concrete pillars and featuring large metal doors and red lighting, showcasing to the viewer the natural path forward in the sequence.

CINEMATIC SEQUENCER
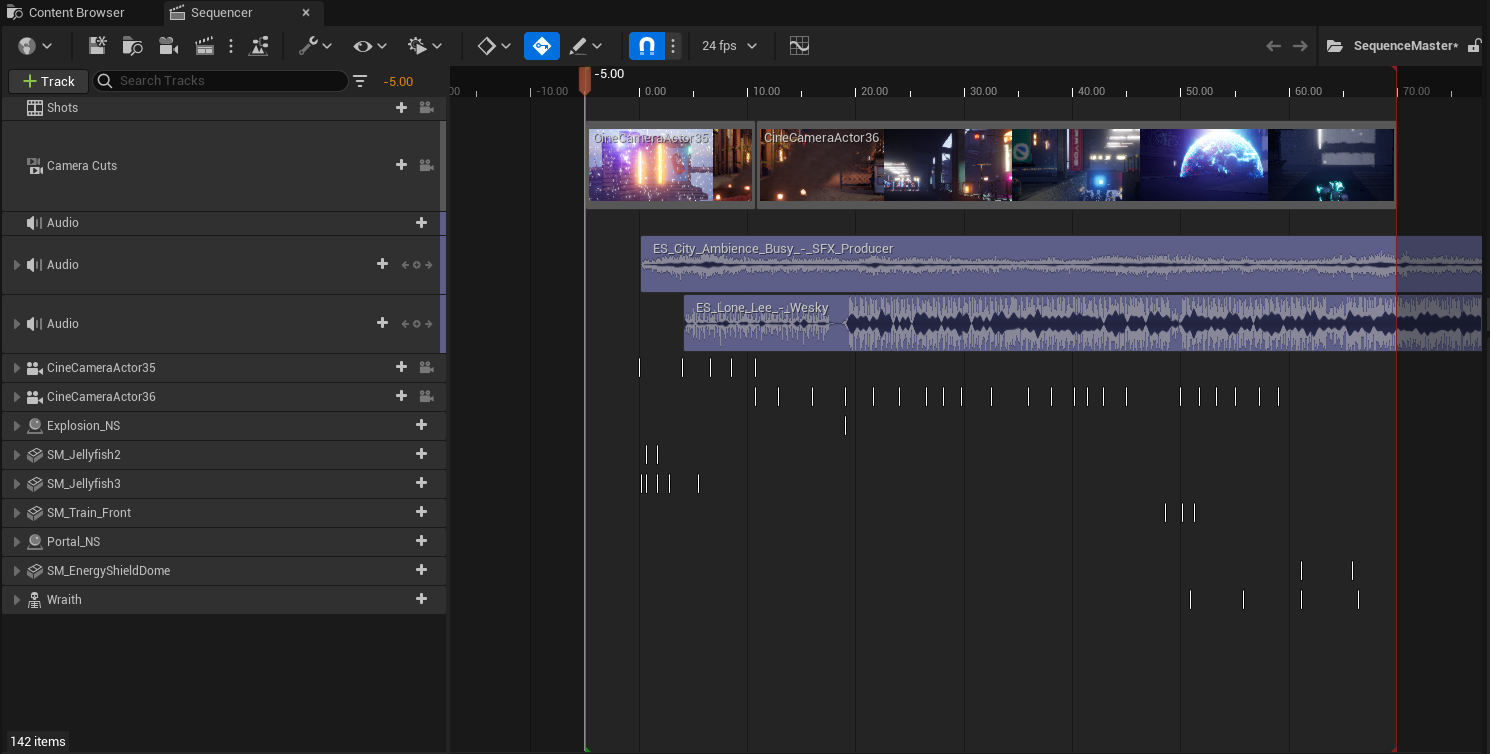
With the scene fully dressed and all of the visual effects made and placed within the scene, the final step in the creation of the sequence was to finalise any changes to the cinematic sequencer, such as adjusting the positioning of the camera in the keyframes and ensuring that the visual effects played at the correct timings.
Two videos that I found helpful in the creation of the sequence and using the sequencer were Beardgames “Unreal Engine 5 – How To Create Cinematics in Sequencer Tutorial” (Beardgames, 2021), which explained the steps of creating a sequence in detail and Jonathan Winbush’s “How To Render with Unreal Engine” (Winbush, 2021) which explained how to use the Movie Render Queue. Prior to the creation of this sequence, I didn’t have much experience with creating cinematics within Unreal and these two tutorials helped to finalise my sequence.
I started the sequence at -5 seconds, as one of the issues that I had when exporting the sequence to render was the rain Niagara system restarting the life cycle, making it obvious to the viewer that the system had just activated. The 5 seconds gave the Niagara system enough time to fall without it affecting the main body of the VFX sequence, which could then be removed when taken into an editing software to create a clean 60-second cinematic.
Issues arose during the rendering regarding the two cinematic cameras and audio that I had set up inside of Unreal. When testing the sequence within Unreal, the first camera that is used to establish the city and pans vertically would smoothly transition to the second camera that is used for the remainder of the sequencer, keeping the flow of the sequence. Upon taking the sequence into DaVinci Resolve, an editing software that I am relatively familiar with from previous projects to make the final adjustments to the sequence, I noticed that the transition between the cameras was not smooth and was an issue that needed fixing. As the first camera shot would end, the camera would revert back to the location of 0,0,0 in the Unreal Project and then jump to the second camera shot, creating a noticeable section that interrupted the sequence.
This led to me using the Niagara System that I had created which combined my fire emitter and smoke emitter and placed it at the start and end of the respective camera shots. By creating a duplicate of the Niagara System to not affect the other effect near the train platform area entrance, I was able to edit the values of the system to generate enough smoke in order to create a smooth cut when the sequence was exported.
Additionally, the audio tracks that I had imported into the sequencer also faced issues when exporting the sequence. Prior to the decision to render with the Movie Render Queue, I was exporting the sequence using the legacy system as EXR files with the Master Audio Submix selected in the settings panel. In a similar manner to the issue with the cinematic cameras, the audio worked correctly when previewed inside of Unreal and with the Movie Preview pop-up during the capturing of the scene. Upon bringing the sequence into DaVinci, I found that the entire sequence was silent. Initially, I thought that I had not selected the correct audio mix in the settings panel and opted to re-render the sequence, only to achieve the same results.

Referenced Material:
Adobe (2020) Guide to the Rule of Thirds in Photography | Adobe. www.adobe.com. Available online: https://www.adobe.com/uk/creativecloud/photography/discover/rule-of-thirds.html#:~:text=frequently%20asked%20questions-.
Beardgames (2021) Unreal Engine 5 – How To Create Cinematics in Sequencer Tutorial. www.youtube.com. Available online: https://www.youtube.com/watch?v=5jHhIah8H7U.
Day, A. (2020) 35mm vs 50mm (Which Lens Focal Length is Better?). Shotkit. Available online: https://shotkit.com/35mm-vs-50mm/.
Film Lifestyle (2022) What Is A 35mm Lens: An Essential Guide [With Examples] • Filmmaking Lifestyle. Filmmaking Lifestyle. Available online: https://filmlifestyle.com/what-is-a-35mm-lens/.
Winbush, J. (2021) How To Render with Unreal Engine. www.youtube.com. Available online: https://www.youtube.com/watch?v=e7CAqCE_SVA.