For my sequence, I wanted to create several effects within Unreal, ranging from complex material instances to Niagara systems that contained multiple emitters. This post breaks down how the effects were made.
CREATING RAIN
As my sequence is taking place at night, I wanted to include a weather effect to add variation to the sky. The rain effect that is seen in the sequence was created by following Matt Aspland’s tutorial “How To Make Rain | Niagara Rain Particle System“.
The rain effect is made from a Niagara fountain emitter that has a few of the base properties changed. The sphere location that confines the particles to spawn within a set radius was changed to a box location, allowing particles to spawn freely within the boundaries of the box. The velocity of the emitter was changed from applying velocity to the particles in a cone shape to the standard velocity, ensuring that the particles would come straight down with the Z value set in the negative.
The shape of the particle was changed by changing the sprite size mode to non-uniform, as this allowed manual changes to the sprite size on the X and Y axis, creating a line when one of the values was larger than the other. At this point, the particle shape was correct, but the rotation of the sprites being spawned was incorrect, as seen below.
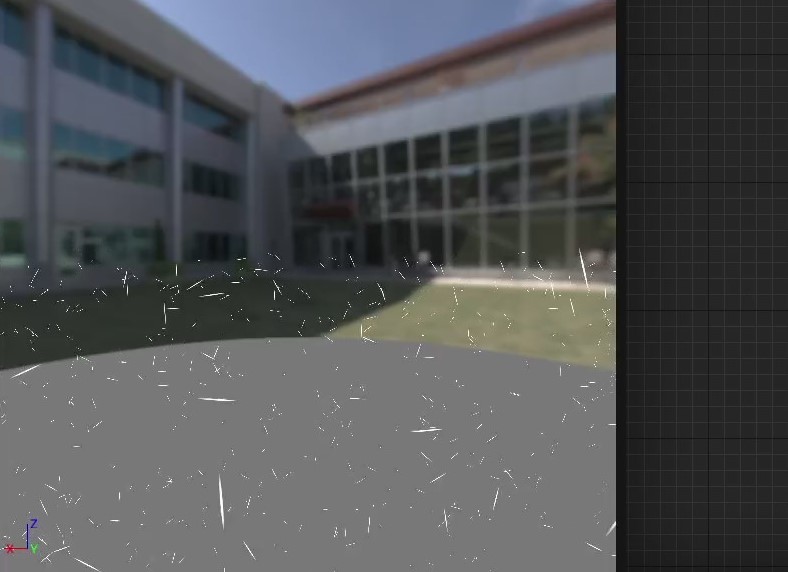
As the velocity for the emitter was set to negative, forcing the particles to flow downward, I was able to fix the issue with the rotation by changing the alignment of the sprites in the rendering section to be aligned with the velocity, mimicking rainfall.
Rain effect (Aspland, 2022).
CREATING AN EXPLOSION
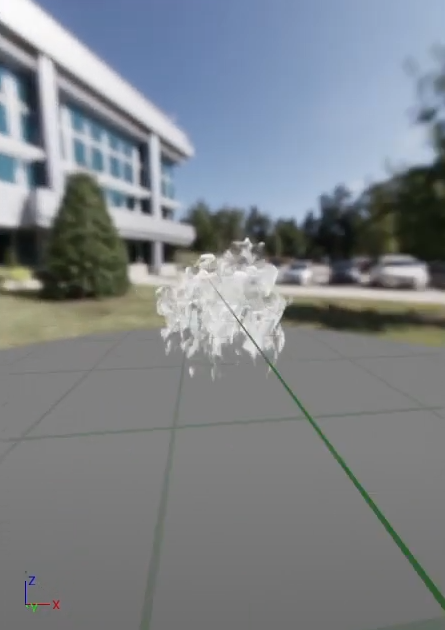
During the set dressing stage, I had an idea of adding an explosion to the “Garage” section of the scene. The explosion was created using Sir Fansi’s tutorial on creating an explosion, as three separate emitters would be required to make the explosion.
The first emitter that I created was the Fire emitter, making use of the Sub UV sheet that is included in the Unreal starter content upon loading a project for the first time. By enabling the Sub UV animation component under particle update, the emitter was able to animate the 36 frames from the UV sheet to create a greyscale animation of flames. After experimenting with the scaling of the sprites, I decided that it would be best to keep the scaling set to random uniform to ensure that the sprites had a varied size, as the real-world counterpart is not limited to a set size and can grow and consequently shrink; From this, I started to increase the spawn rate and make changes to the spawn location, setting the sprites to spawn from a location within the bounds of a sphere rather than spawning from a singular point.
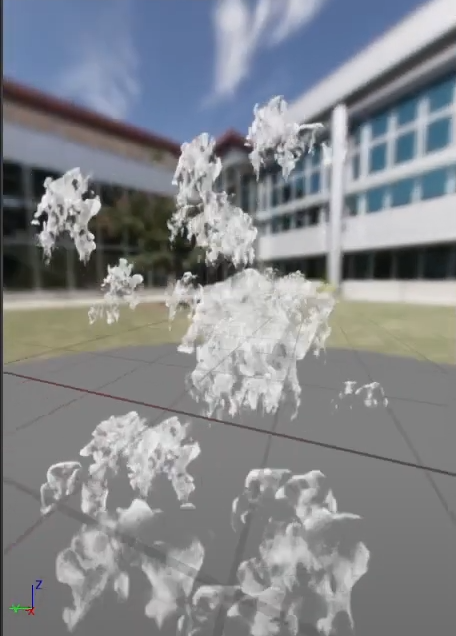
To achieve a realistic colour for the fire, the RGB values were changed to have a higher amount of red shine through over the green and blue channels. Furthermore, to make the fire feel realistic, the velocity of the particles was set to have minimum and maximum values and vector noise force was added to the emitter, giving the fire a feeling of volatility and randomness in the speed of the particles.
Fire emitter (Sir Fansi Gamedev, 2021b)
The smoke emitter also made use of its respective Sub UV sheet that is included in the Unreal starter content. The smoke was animated by repeating the same steps that were taken in the creation of the fire emitter and set to spawn in a random but uniform size, ensuring variation between the particles inside of the bounds of a sphere location. The velocity of the smoke was set to have a randomised value between a set minimum and maximum on the X and Z axis, as I wanted it to appear as though the smoke was being guided forwards by a wind current from behind the explosion location, whereas adding velocity on the Y axis would have moved the smoke horizontally.
The colour of the smoke that can be seen in the explosion is set to a much darker colour than seen in the video below. This was intended, as darker smoke can be an indicator that something manmade is burning such as tires, vehicles or a structure (RedZone, 2016)
Smoke emitter (Sir Fansi Gamedev, 2021c)
Both the fire emitter and smoke emitter combined in a Niagara system
The explosion Niagara system is composed of the initial explosion and flaming shrapnel followed by the combined fire and smoke, seen above. In the same manner for creating both the smoke and fire emitters, the explosion used the respective sub-UV sheet from the Unreal starter content and a sphere location was added to control the area in which particles can spawn.
As I wanted both the fire emitter and smoke emitter to play after the initial explosion, I had to edit the timing slightly, as currently, all emitters were playing from the first frame. I added a delay of 0.6 seconds to the fire and smoke emitters after experimenting with the timings, as this allows for nearly 70% of the explosion to play before smoothly transitioning so that the fire and smoke are visible.
Explosion emitter (Sir Fansi Gamedev, 2021a)
CREATING AN AUDIO VISUALISER
In the same vein as to how the song Spoiler by Hyper was used in the Cyberpunk 2077 E3 trailer, I had planned to use audio in my sequence. To amplify this, I wanted a way that the viewer could see something changing in the scene in relation to the audio being played, which led to the creation of an audio visualiser.
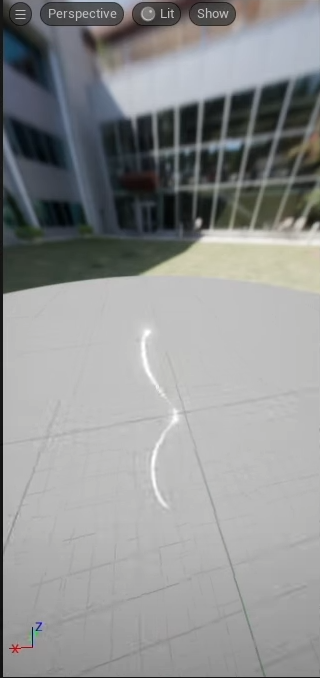
The tutorial that I followed to create the audio visualiser was Coreb Games’ “UE5 l How to Create Sound Visualizer using Niagara l VFX Tutorial ” on YouTube. The audio visualiser system uses a fountain emitter as the base template and has changes to the shape location, changing it from a sphere location to a torus and changes to the velocity, changing it from adding velocity in a cone shape to adding it from a specified point. The gravity force that was included in the template was removed, as this was forcing the particles to flow down whereas I wanted the particles to remain on the surface.
To have the particles respond to any audio track playing within the scene, I added a scratch pad module to the system. The scratch pad module uses an audio spectrum module that can analyze the audio data that it receives. The Map Get node has two additional variables, the float variable Movement Power which can adjust the intensity of the spectrum and velocity, which can adjust the speed of the particles being spawned based on the audio spectrum.
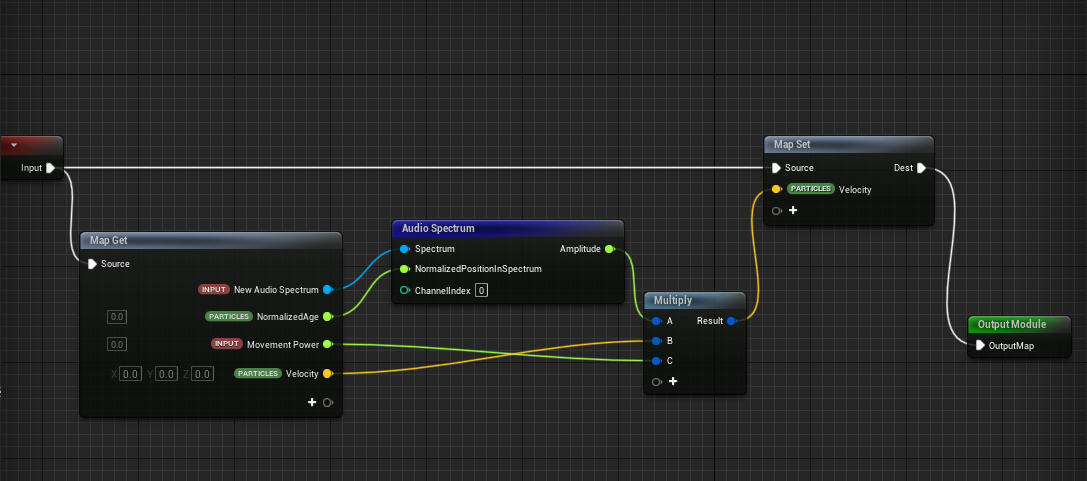
With the scratch module set up, the variable for the movement power had to be set in the newly created sound module under particle update for it to work correctly.
Initially, I had sim target for the Niagara system set to CPUSim, as I was unsure of whether the computer had hardware that could handle the simulation of thousands of particles. The tutorial I was following had 80,000 particles in their Niagara system, and I was hesitant to follow their steps entirely in case the computer crashed. After seeking advice regarding the issue, I had a duplicate version of the audio visualiser that was set to GPUSim. This way, I could gently increase the number of particles being spawned and test how the computer handled incremental increases.
Audio Visualiser (Coreb Games, 2022b)
CREATING A PORTAL
As seen in both the initial storyboard idea and the updated version, the sequence ends with the reveal of a character. I decided to have the character reveal themselves by stepping out of a portal rather than have the camera peer through the door as seen in the first storyboard, as this would reduce the need for set dressing.
I followed Coreb Games’ YouTube video “UE4 Portal Effect l Unreal Engine 4.26 (Tutorial)” to create the portal effect, as the portal required a material instance to be created first. At the core of this material is the texture that was provided in the tutorial and the rotator nodes to create movement within the material. The other variables such as the radius, radial brightness and power control how the material behaves when an instanced version of the material is created.
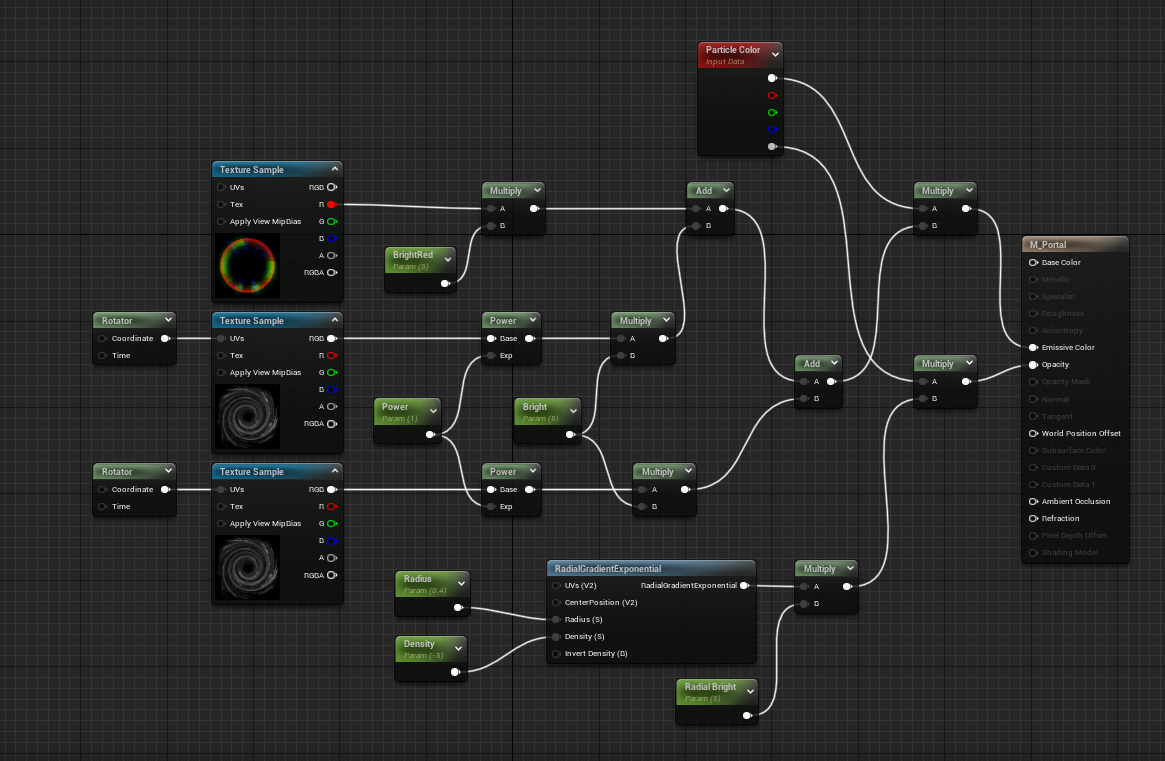
Additionally, I created a Niagara system from a blank template, as the tutorial at this point in time was no longer compatible with Unreal 5. After changing the default sprite material to the portal material created above, I started to make changes to the spawn rate. I experimented with various values for the spawn rate, yet ultimately opted to keep the spawn rate of the portal low and changed its life cycle to only play once, as I didn’t require it to loop. The particles emitting from the portal originate from a modified fountain emitter that holds the same RGB values as the portal.
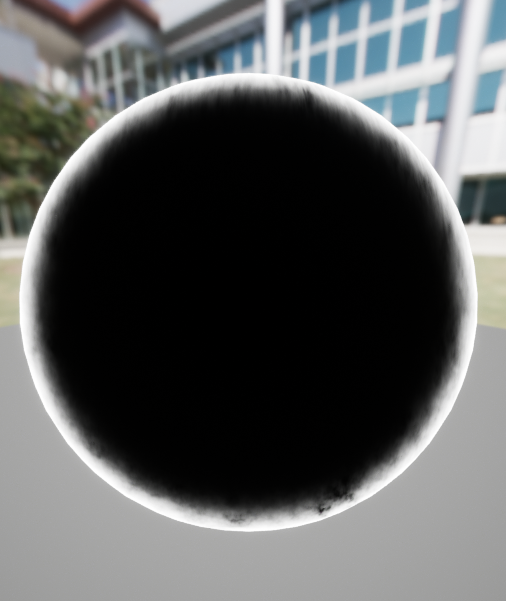
Portal with particles emitting (Coreb Games, 2021b)
CREATING A HOLOGRAM
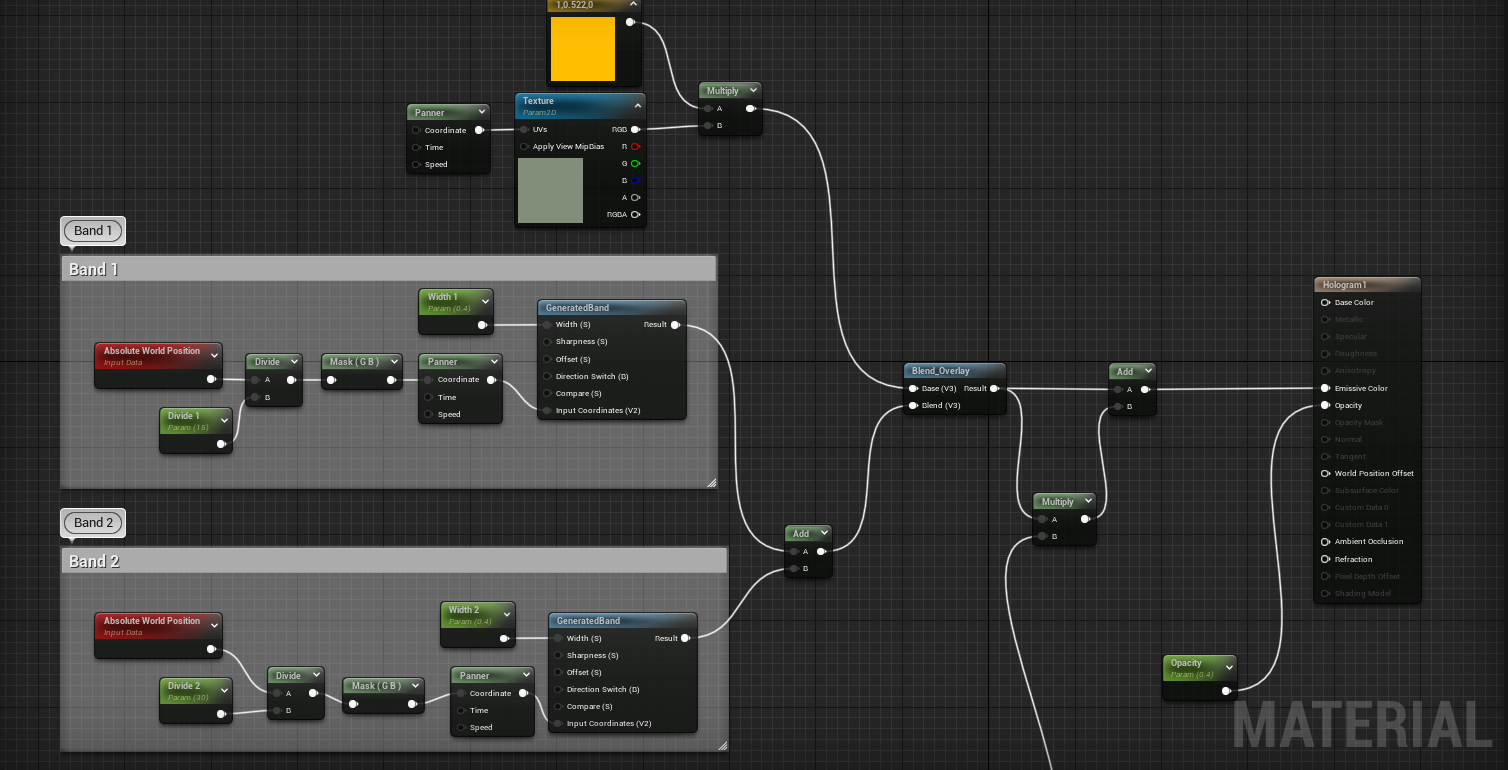
The hologram that is seen on the train platform was created by following Coreb Games’ YouTube video “UE4 How to make Hologram Effects” and applied it to an FBX text model that I had made in Autodesk Maya.
Band 1 and Band 2 make use of the Generated Band node, which forms a large band horizontally across a surface that it would be applied. The band has subsequently been divided, using the absolute world position and a custom-designated parameter to create thin lines that pan down; As the value of “divide 2” has increased, there is variation between the bands generated, which when fed into the Add node creates the flickering effect.
As I wanted the material to provide a faint glow, I made use of the Fresnel function, which creates a glow around the edges of the material. I didn’t want this to be extremely bright, yet I also didn’t want it to be something that can be easily ignored, which led to experimenting with the power parameter until the desired effect was reached. The use of the noise texture sample that is in the Unreal starter content smoothes out the solid glow formed from the fresnel function, creating a smooth transition between the centre of the material and the glowing outer.
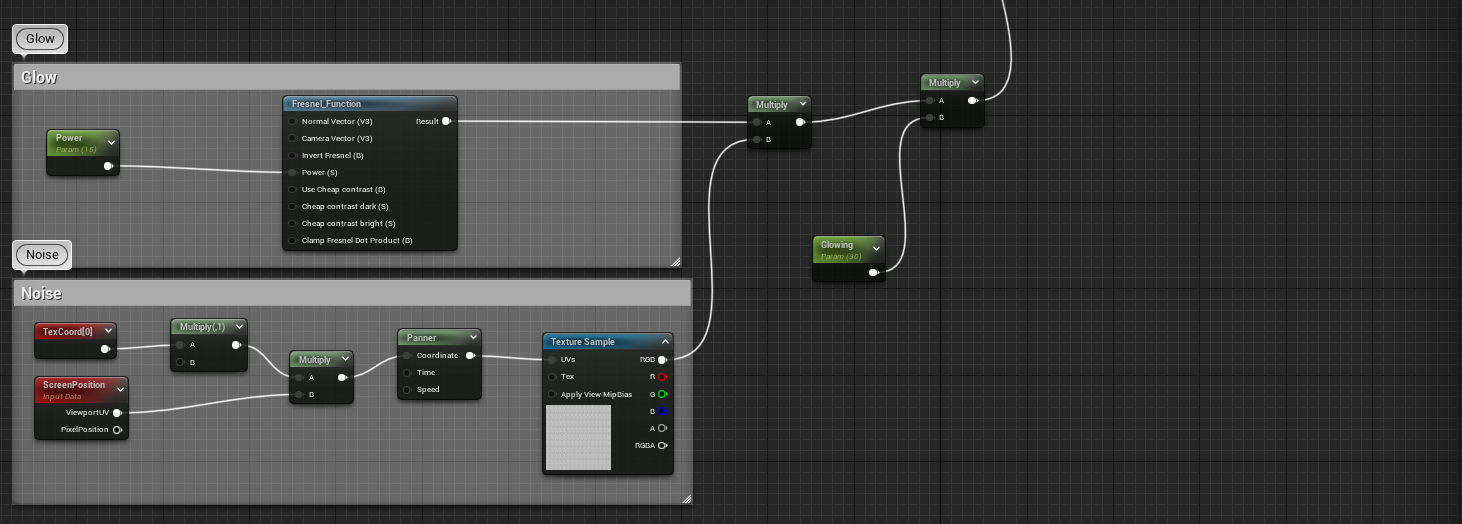
Hologram effect (Coreb Games, 2021a)
CREATING MOVING ELECTRICITY
The moving electricity that is seen on the train platform was created by following Coreb Games’ YouTube video “UE4 Simple & Advanced Spark Lightning Effect”. I had previously had issues with a separate electric tutorial and despite my best efforts, I could not get the same effect that the tutorial showed; I knew that I wanted to keep an electric element in this area and at the time of creation, removing this element would be detrimental to creating the sequence.
At the core of this material is the texture provided in the tutorial and the motion 4-way chaos node, which creates movement in the material. The radial gradients in combination with the motion 4-way chaos node creates a gradient originating from the centre point, ensuring that as the electricity moves further away from the origin point, it will appear less intense, almost as if it is losing power.
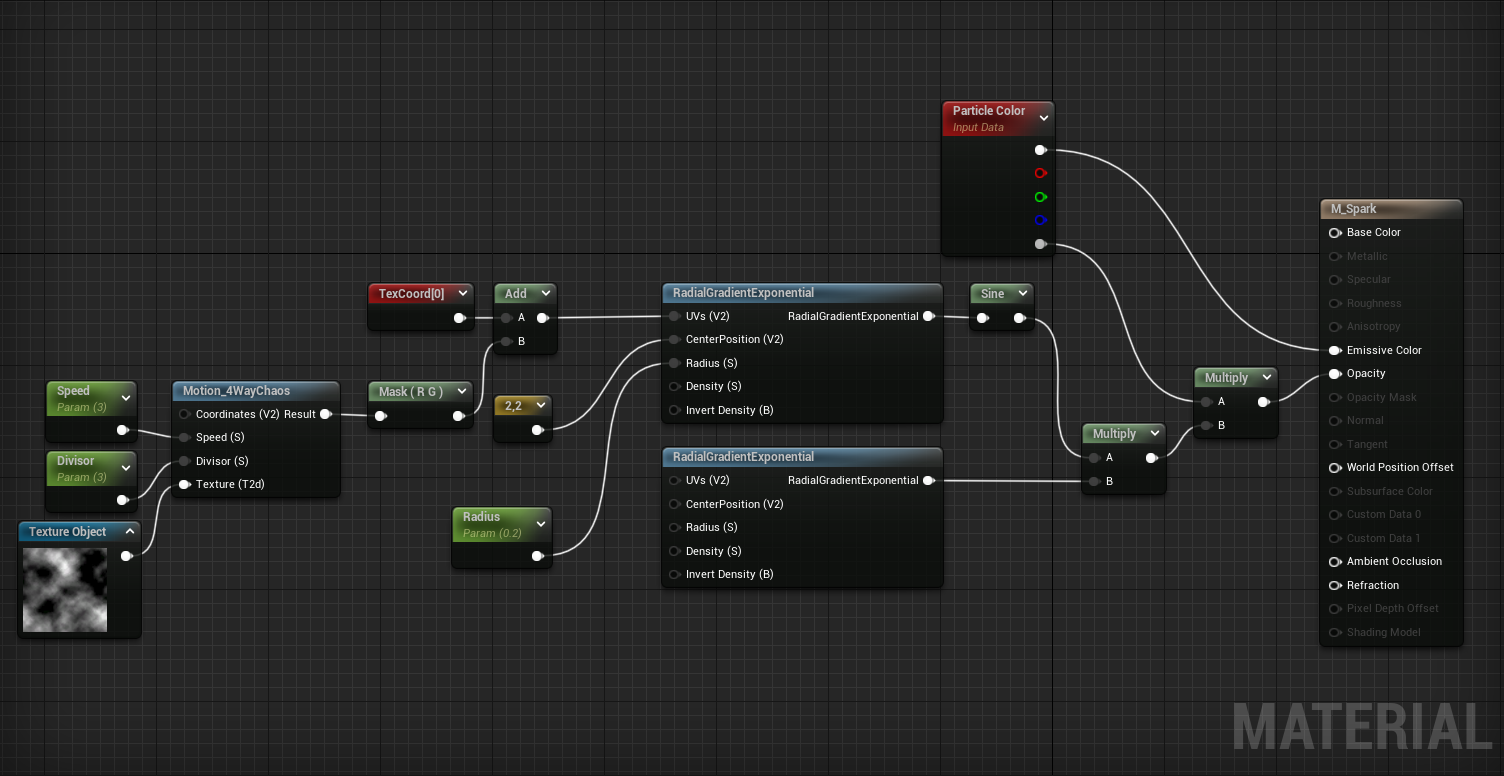
Electricity effect (Coreb Games, 2022a)
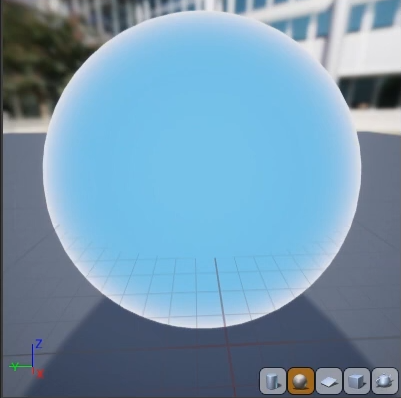
CREATING A SHIELD
As the character is revealed to the viewer, I wanted a shield to appear over the character model, as if they had a combat encounter in the location they are exiting from.
The first iteration of this shield was created by following Coreb Games’ YouTube video “UE4 Shield Effect”. To achieve the stereotypical blue colour that is seen on energy shields in the sci-fi genre, I used the Fresnel node and two vectors used for the colouration feeding into a lerp node; This causes the centre of the material to be obscured with the primary colour whilst the secondary colour and the fresnel node creates the glow around the outside.
To create the hexagons that are visible on the shield, I used the “Tech_Hex_Tile” material from Unreal’s starter content in tandem with a GeneratedBand node and a panner node, making them only visible as the band pans down over the surface.
First shield iteration (Coreb Games, 2021c)
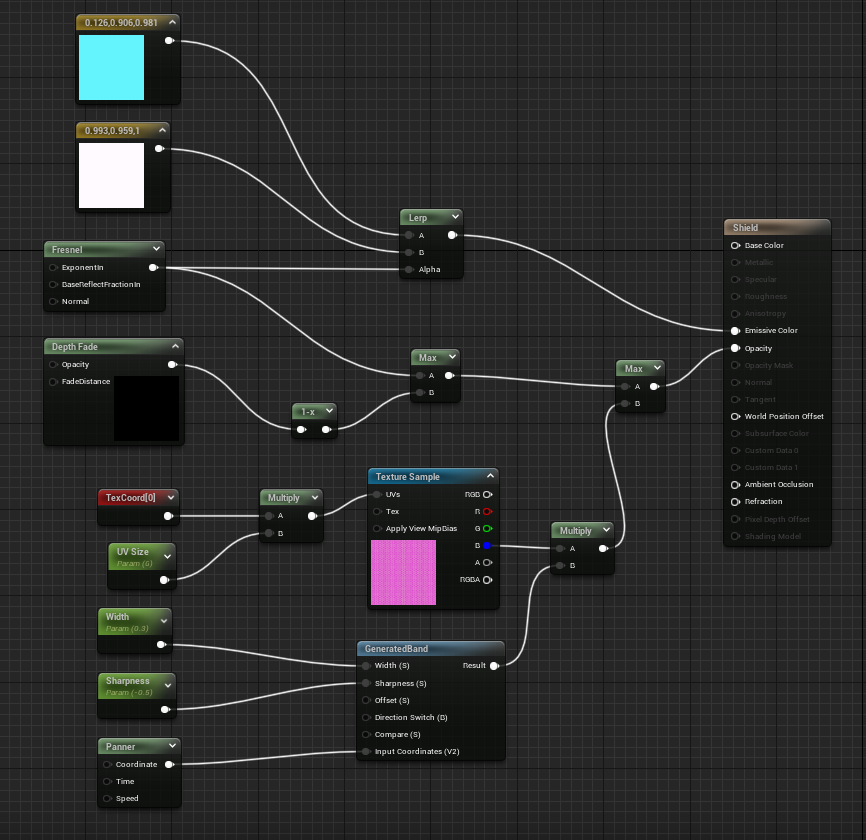
IMPROVING THE SHIELD
I wanted to improve the quality of the shield, as it would be one of the last visual effects that is shown to the viewer and I wanted it to be visually engaging to finish the sequence with. The tutorial that I decided to follow was Rebelway’s “Energy Shield Portal in Unreal Engine & Houdini (Pro Unreal Engine Tutorial)” on YouTube, as I have been following Rebelway and their works in Houdini for some time and was excited to see an Unreal tutorial. I followed the first half of the tutorial, as the remaining sections of the tutorial related to how this could trigger on a player’s movement and increased in difficulty significantly beyond my capabilities.
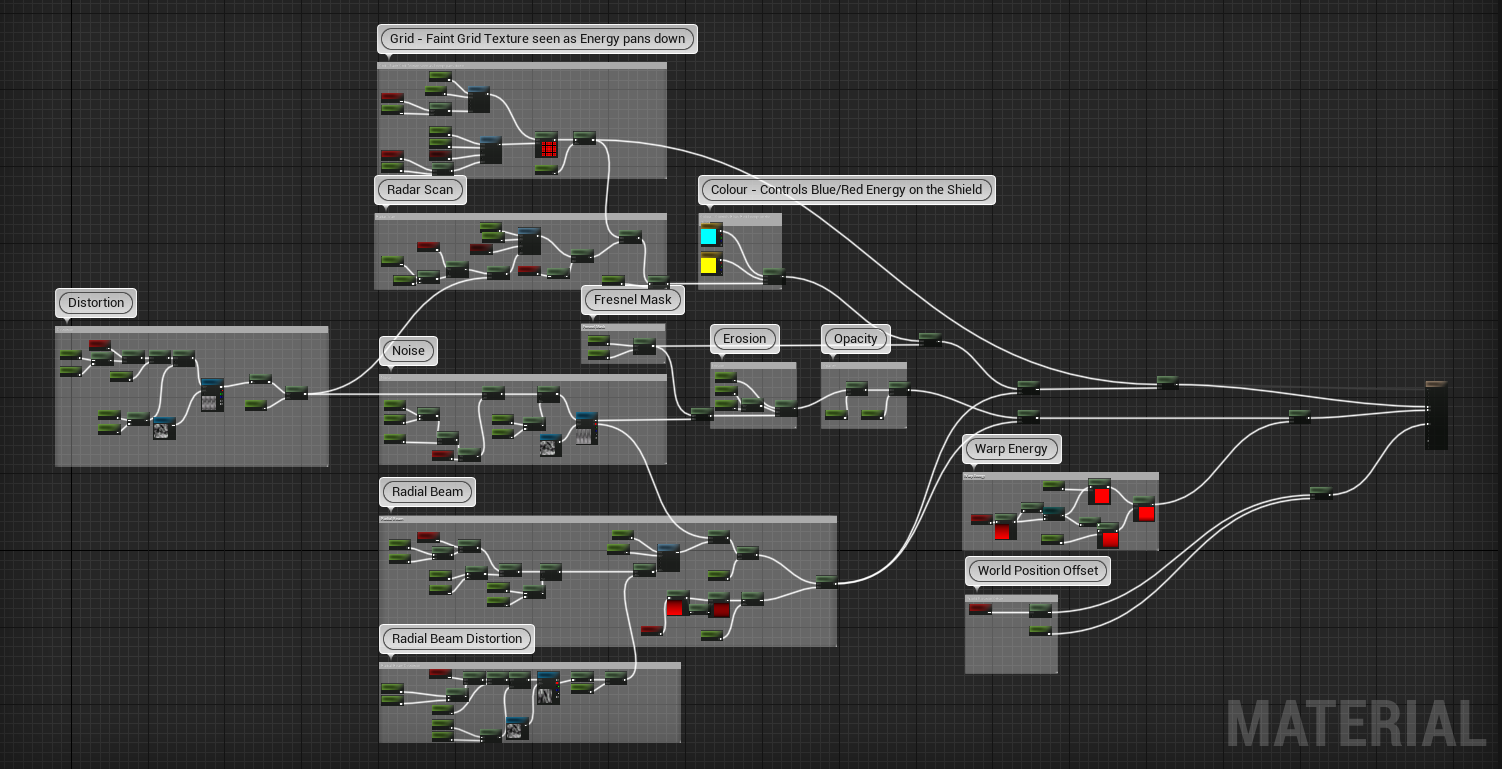
The material set up for this shield was arguably the largest and most complex material that I have made since using Unreal Engine. I recreated the material setup that was shown in the tutorial within my project and used comment boxes around specific sections to remain organised. The texture that is used is a noise texture that was provided in the Rebelway tutorial.
YouTube link in case the embedded video fails: https://www.youtube.com/watch?v=1BKhkBPRk_M
The distortion section of the material setup has parameters to control the scale of the UVs on both the X and Y axis. I experimented with a few different values and settled on the Y scale lower than the X, which made the material appear as though it was stretching to protect the character. This was then placed into a panner node to create movement in the material and then passed into the Radar Scan section and the Noise section.
The Grid section is formed from two Generated Band nodes with one of the bands having its direction switched, which creates a cross-hatch pattern in the material from the scale parameter being set to 512. I didn’t want to reuse the hexagon material that I had used in the first shield iteration as I wanted further control over the creation of the pattern, which led to the use of the generated bands to create the grid effect.
The radar scan section controls the red band that can be seen moving across the dome in the X direction. This takes the Generated Band node, which normally creates a large band that spans across the material horizontally and switches the direction so that it is vertical. The time and sine nodes control the state of the red band, turning it off and on which I feel makes the shield appear alive and reactive to its surroundings. In a similar manner, the radial beam and the radial beam distortion are set up the same as the radar scanner, yet moving down over the material.
The colour section works in tandem with the timing from the radar scan section. When the sine node has a value of 1, turning it to the on state, the colouration for the red band is activated and visible. When the sine node does not have this value, the red colouration is turned off, keeping the shield the bright blue colour.
Final shield iteration (Rebelway, 2022)
Referenced Material:
Aspland, M. (2022) How To Make Rain | Niagara Rain Particle System – Unreal Engine Tutorial. www.youtube.com. Available online: https://www.youtube.com/watch?v=s_UQYuM1RWU [Accessed 1 Jan. 2023].
Coreb Games (2021a) UE4 How to make Hologram Effects l Unreal Engine 4.26 (Tutorial). www.youtube.com. Available online: https://www.youtube.com/watch?v=NJ3MUQYR7ok [Accessed 1 Jan. 2023].
Coreb Games (2021b) UE4 Portal Effect l Unreal Engine 4.26 (Tutorial). www.youtube.com. Available online: https://www.youtube.com/watch?v=65hZL9oXD5c [Accessed 1 Jan. 2023].
Coreb Games (2021c) UE4 Shield Effect l Unreal Engine 4.26 (Tutorial). www.youtube.com. Available online: https://www.youtube.com/watch?v=5jvKAvjNJZE&list=LL&index=27 [Accessed 1 Jan. 2023].
Coreb Games (2022a) UE4 Simple & Advanced Spark Lightning Effect l 5-Minute VFX Tutorial l Unreal Engine 4.26 (Tutorial). www.youtube.com. Available online: https://www.youtube.com/watch?v=OxVZUzadTQY [Accessed 1 Jan. 2023].
Coreb Games (2022b) UE5 l How to Create Sound Visualizer using Niagara l VFX Tutorial l Unreal Engine 5. www.youtube.com. Available online: https://www.youtube.com/watch?v=qUfFzlfLNXc&list=LL&index=27 [Accessed 1 Jan. 2023].
Rebelway (2022) Energy Shield Portal in Unreal Engine & Houdini (Pro Unreal Engine Tutorial). www.youtube.com. Available online: https://www.youtube.com/watch?v=lzLfGRp-0_w&list=LL&index=15 [Accessed 1 Jan. 2023].
RedZone (2016) Smoke Color Can Depict Fuel Type. RedZone. Available online: https://www.redzone.co/2016/01/23/smoke-color-can-depict-fuel-type/. [Accessed 1 Jan. 2023].
Sir Fansi Gamedev (2021a) Niagara Explosion tutorial in Unreal Engine 4 (UE4 explosion niagara tutorial). www.youtube.com. Available online: https://www.youtube.com/watch?v=pfr4hfF8NKw&list=LL&index=31 [Accessed 1 Jan. 2023].
Sir Fansi Gamedev (2021b) Niagara fire tutorial in Unreal Engine 4 (UE4 Fire niagara tutorial). www.youtube.com. Available online: https://www.youtube.com/watch?v=rKIqa_IUkBo&list=LL&index=33 [Accessed 1 Jan. 2023].
Sir Fansi Gamedev (2021c) Niagara Smoke tutorial in Unreal Engine 4 (UE4 smoke niagara tutorial). www.youtube.com. Available online: https://www.youtube.com/watch?v=tTTL_bzQLuY&list=LL&index=30 [Accessed 1 Jan. 2023].